Using Tessitura Integrated Scheduled Triggers
Tessitura Integrated Scheduled Triggers are a great way to manage event or action specific communications to your patrons. From performance reminders, to follow-ups, or membership and subscriber communications, Tessitura Integrated Scheduled Triggers save you time and energy by automating these these types of recurring communications.
In this Article:
There are two types of Tessitura Integrated Triggers available. Performance Triggers use out of the box performance and order data in Tessitura to identify which contacts should be entered into the associated Automation. Custom Triggers use a custom view in Tessitura, which gives you a lot of flexibility. The custom view defines which contacts should be entered into the associated Automation. Once a Tessitura Integrated Scheduled Trigger is created and activated, the contacts who meet the Trigger criteria at that time will enter the associated Automation. This process happens every time the job runs, each time pulling in the new set of contacts who meet your Trigger criteria.
What Is an Automation?
An Automation is a set of predefined actions and logic to automate some of your day-to-day efforts. Automations contain a sequence of events that runs when triggered by set starting conditions. Once contacts enter an automation, they will go through a series of actions and logic that you’ve defined. Using the automation builder, you can mix and match a variety of elements to create highly targeted and personalized automations that accomplish a wide variety of tasks.
To get started, navigated to the Scheduled Trigger page and click the "Add Trigger" button.
Choose Scheduled Trigger Type
You'll be presented with two options, create a new Performance Trigger or create a new Custom View Trigger.

Performance Triggers
The primary function of a Performance Trigger is to pull email addresses attached to an order for a performance in Tessitura and send performance reminder and follow-up email campaigns. However, you are not limited to these types of actions. Additional components of an Automation could be sending an SMS message or using site messaging to place a reminder onto your website that only ticket holders for a specific performance will see.
Additionally, Performance, Order, and Web Content will be returned from Tessitura.
Name Your Scheduled Trigger

Choose a Prospect2 Automation
This is the Automation that defines the actions and logic contacts will encounter once they are added to the Automation.

Performance Keywords & Pricetypes
You can filter your performances by keywords or orders with certain sub-line item pricetypes. Keywords and pricetypes can be either inclusive or exclusive. For example, you might choose to segment performances by applying a 'matinee' keyword to all those performances and including that keyword within Step 3. You could also segment season subscribers by including/excluding subscriber pricetypes in the pricetype selection fields.

If you are using Tessitura keywords to include or exclude certain performance, the keyword can be applied at any ticketing level in Tessitura.
- Performance Level: Is the highest priority. If a keyword is applied directly to a performance, that's the one that will be used.
- Production Season Level: If no keyword is found at the performance level, the system will look for a keyword on the production season. Applying a keyword here will "waterfall" down to all performances within that production season.
- Production Level: If no keyword is found at the performance or production season level, the system will look for a keyword on the production itself. This will "waterfall" down to all production seasons and performances within them.
- Title Level: This is the lowest priority. A keyword applied here will apply to all productions, seasons, and performances under that title.
Choose the Time of Day Contacts Will Enter the Automation
Performance Triggers run once per day. Choose the the time of day to pull performance, order, and web content data from Tessitura to trigger the Prospect2 automation.

Tessitura Performance Search Window
Select the number of days before or after the performance to collect the contacts to enter into the Automation.
For example, if you have a show opening on March 15th and you want patrons to receive their performance reminder 2 days before, you will select “2” and "Future." You will use the "Future" option anytime you want to trigger something before a performance. Using this example date, this Trigger would run on March 13th for the March 15th performance. If you are setting a Trigger up for a post performance communication that is sent to patrons the day after their performance, you will select “1” and "Past." You will use the "Past" option anytime you want to trigger something after a performance. Using the example date above, this Trigger would run on March 16th, looking at performances that meet your Trigger criteria for March 15th. Any following performances that meet your trigger criteria will follow the same logic automatically. If there are no performances that meet that criteria, the job will try again the next day.
For 'day of' reminders, select "0" and the "Past" or "Future" option will be ignored.

Add a Description of this Trigger
Add a short description of the trigger, actions and logic of the associated Automation to help others understand the purpose or important details related to this Trigger.

In a Performance Scheduled Trigger, by default Prospect2 searches for the email address to deliver to in this order:
1. An email address associated with the order.
2. An email address of defined eaddress type (P2DefaultEaddressType in T_DEFAULTS) associated with the initiator (initiator_no) of the order.
3. An email address associated with the initiator (initiator_no) of the order marked as primary.
4. An email address of defined eaddress type (P2DefaultEaddressType in T_DEFAULTS) associated with the owner (customer_no) of the order.
5. An email address associated with the owner (customer_no) of the order marked as primary.
6. An email address of the primary affiliate with the p2DefaultEaddressType.
7. An email address associated with the primary affiliate marked as primary.
8. Use the built-in Tessitura function FT_GET_EADDRESS() to identify any other potential emails in the event any of the above fail to find one (one last shot).
If you wish to enable functionality to additionally return Recipients for reminders and/or only return patrons who attended an event in post visit communications, click here to learn more.
Add Notification Email Addresses
Enter the email addresses of contacts within your organization that should receive status notifications for this Trigger. The email addresses are also entered into the associated Prospect2 Automation upon each scheduled run and will follow any actions defined within the Automation. They may qualify for actions in the Automation such as an email campaign, sms messages, and more. 
Notification emails typically do not have 'real' order data that's returned during each run so in order to simulate what your patrons may receive, we retrieve the 1st stack of order data from Tessitura and populate the data to custom fields on the notification email contact record in Prospect2. This happens during every Scheduled Automation job run. The same occurs when you're triggering a Scheduled Automation Test or Run Now. Therefore, you may see a different name & associated performance data on a Notification Emails contact record, while your email address will remain the same.
Custom View Trigger
Custom View Triggers pull email addresses associated with a custom view in Tessitura. The custom view is a SQL select statement built to collect email addresses in your database based on custom criteria. A custom view is much like an online report that is created by your database administrator. Common use cases of Custom View Triggers include membership renewals, abandoned cart reminders, discount alerts, donation acknowledgements and many more.
Name Your Scheduled Trigger

Choose a Prospect2 Automation
This is the Automation that the contacts are entered into after the Scheduled Trigger runs. The Automation is what defines the actions and logic the contacts will encounter.

Choose a Tessitura Custom View
Select the Custom View to associate to this automation.

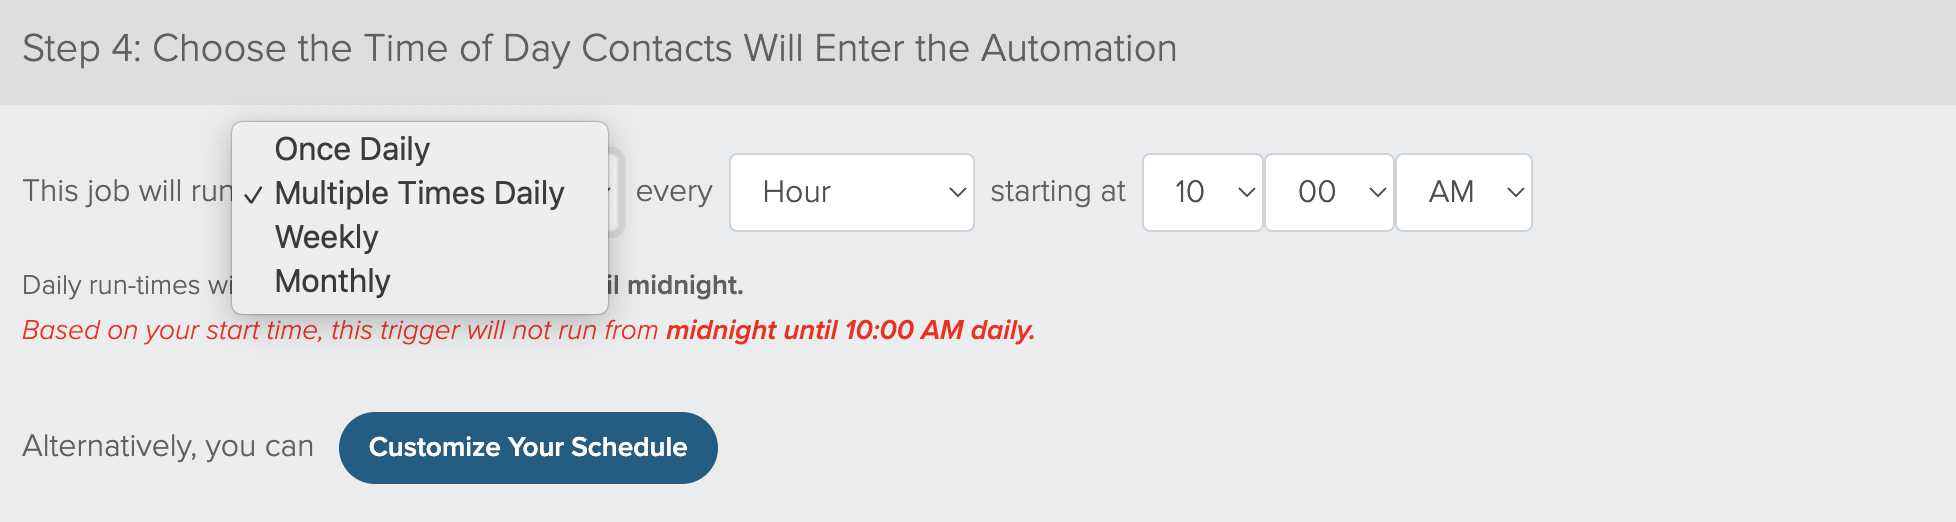
Choose the Time of Day Contacts Will Enter the Automation
Define the time of day you want your Sync to process. A dropdown is available for Daily, Multi-Daily, Weekly, or Monthly scheduling options.
Daily will run each day at the chosen time of day. Weekly will run on the selected day of the week at the chosen time. Monthly will run on the selected day of the month at the chosen time. Multiple Times Daily will run each day at the specified times, as frequent as every 15 minutes, starting at the defined hour and minute. Customize Your Schedule allows you to choose various times throughout the day.
Set the Tessitura Date Selection Window
The view in Tessitura pivots off of the custom_date column. Select the number of days before or after the custom_date in the view to collect the contacts to enter into the Automation. If this logic is included in the custom view, this number should be set to zero.

Add a Description of This Trigger
Add a short description of the trigger, actions and logic of the associated Automation to help others understand the purpose or important details related to this Trigger.

Add Notification Email Addresses
Enter the email addresses of contacts within your organization that should receive status notifications for this Trigger. The email addresses are also entered into the associated Prospect2 Automation upon each scheduled run and will follow any actions defined within the Automation. They may qualify for actions in the Automation such as an email campaign, sms messages, and more.

Notification emails typically do not have 'real' data that's returned during each run so in order to simulate what your patrons may receive, we retrieve the 1st stack of data from your view in Tessitura and populate the data to custom fields on the notification email contact record in Prospect2. This happens during every Scheduled Automation job run. The same occurs when you're triggering a Scheduled Automation Test or Run Now. Therefore, you may see a different name & associated custom data on a Notification Emails contact record, while your email address will remain the same.
Activate Your Trigger
Once you've confirmed your trigger is set up correctly, activate the event by toggling it from OFF to ON on the Scheduled Trigger Page.
Once the job begins to run as scheduled, you can monitor its progress on the Console page under the What's Happening Now? section. Events that have processed in the last 2 minutes will display within the What's Happening Now? section on the Console page; Previously completed events will temporarily display in the Recent Activity section on the Console page. Additional details about the event process, such as criteria used, total contacts processed, and error results/reasons will be accessible in the Activity Log for up to 30 days.