How to Use the Prospect2 Custom Screen in Tessitura
The primary purpose of the Prospect2 Custom Screen is to provide Tessitura users, such as Box Office staff or Customer Service Representatives, with key functions to assist patrons with managing their digital communication preferences directly within a constituent record in Tessitura.
In this Article:
Here are some important points to keep in mind about the Prospect2 Custom Screen and how it is best used:
- Your patrons can self-manage their preferences through forms or alternate opt-in preferences that you make publicly available, such as web sign up, subscription management, or unsubscribe forms. The Prospect2 Custom Screen is where you can assist patrons with Prospect2 related data, such as preference management, directly in Tessitura.
- Constituent records in Tessitura can have one primary email address, and/or multiple email addresses. The Custom Screen allows you to track and update preferences for each individual email address that may exist on a constituent record. This means that constituent records with multiple email addresses have unique preferences per email address. Remember that email and SMS digital communications are permission-based and you are required to have some level of permission to send these types of communications. While the Prospect2 Custom Screen can be used to add new or change existing preferences, you should proceed with caution, as doing so without consent may cause spam complaints for your organization.
- The proper use of the Prospect2 Custom Screen should be considered an important part of your organizations overall contact management processes. Be sure that anyone in your organization who works with constituent preferences is properly trained to use the Custom Screen.
To edit a particular constituent's preferences, simply locate the appropriate constituent record in Tessitura, navigate to the Custom Screen and select the Prospect2 radio button.
Select an Email Address
Choose an email address from list of active email addresses in the dropdown to review or adjust communication preferences. The Primary email address will have display (primary) following the email address. Once an email address is selected from the dropdown, the page will reload with the current preferences for that email address in Prospect2.

An alert will appear if an email address you've selected has Hard Bounced in the past. If you have confirmed the email address is now valid, re-subscribing the contact will not debounce the email address. To debounce an email address, you must send the email address and details on how you've confirmed the email is valid to help@prospect2.com.
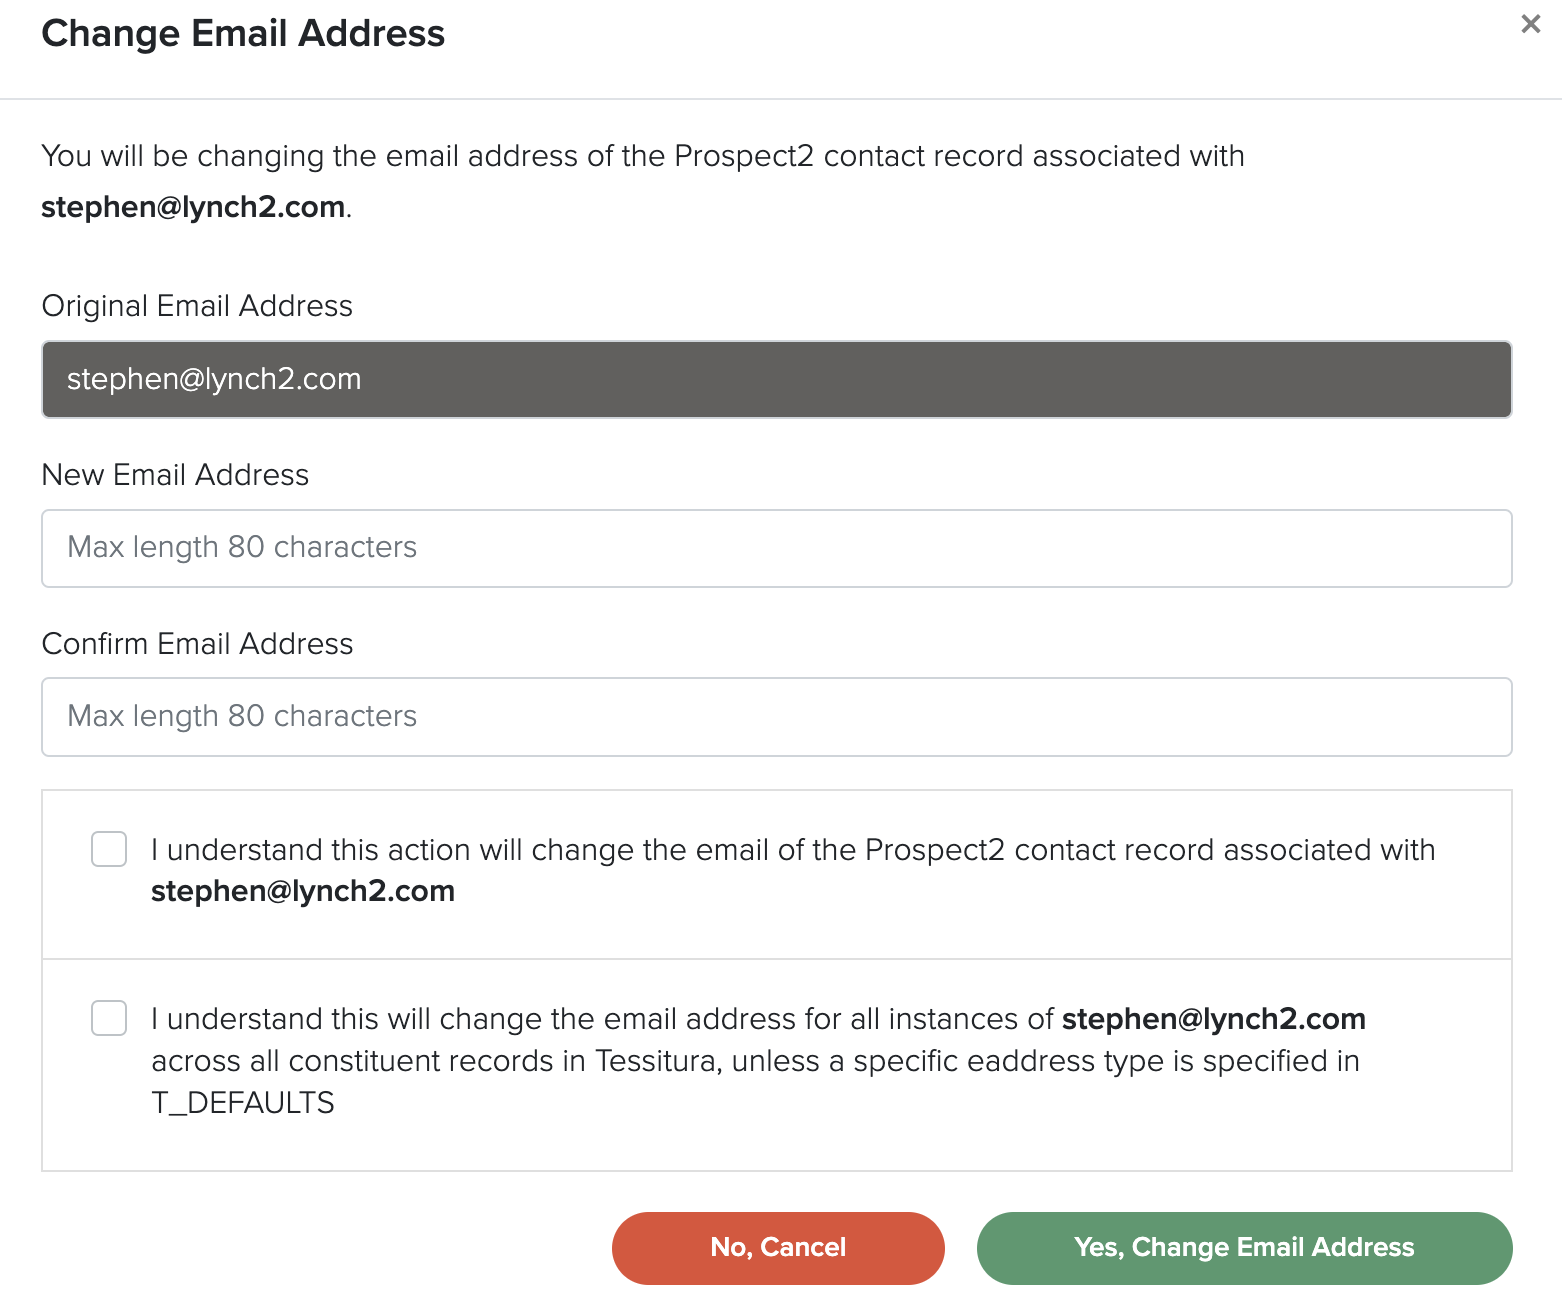
Change Email Address
To change an existing email address in a constituent record, choose an email address from the dropdown and select the Change Email Address button. A modal window will appear with confirmation steps that include a 2 step email address confirmation and an additional verification of change, which must be completed in order to proceed. Once the change is submitted, the screen will refresh to display the new email address selected in the dropdown.
Changing an email address will change all instances of that email address across any constituent records the email address is associated with in Tessitura, unless a specific eaddress type is specified in T_DEFAULTS. This will also change the email address that is associated with the existing contact record in Prospect2.
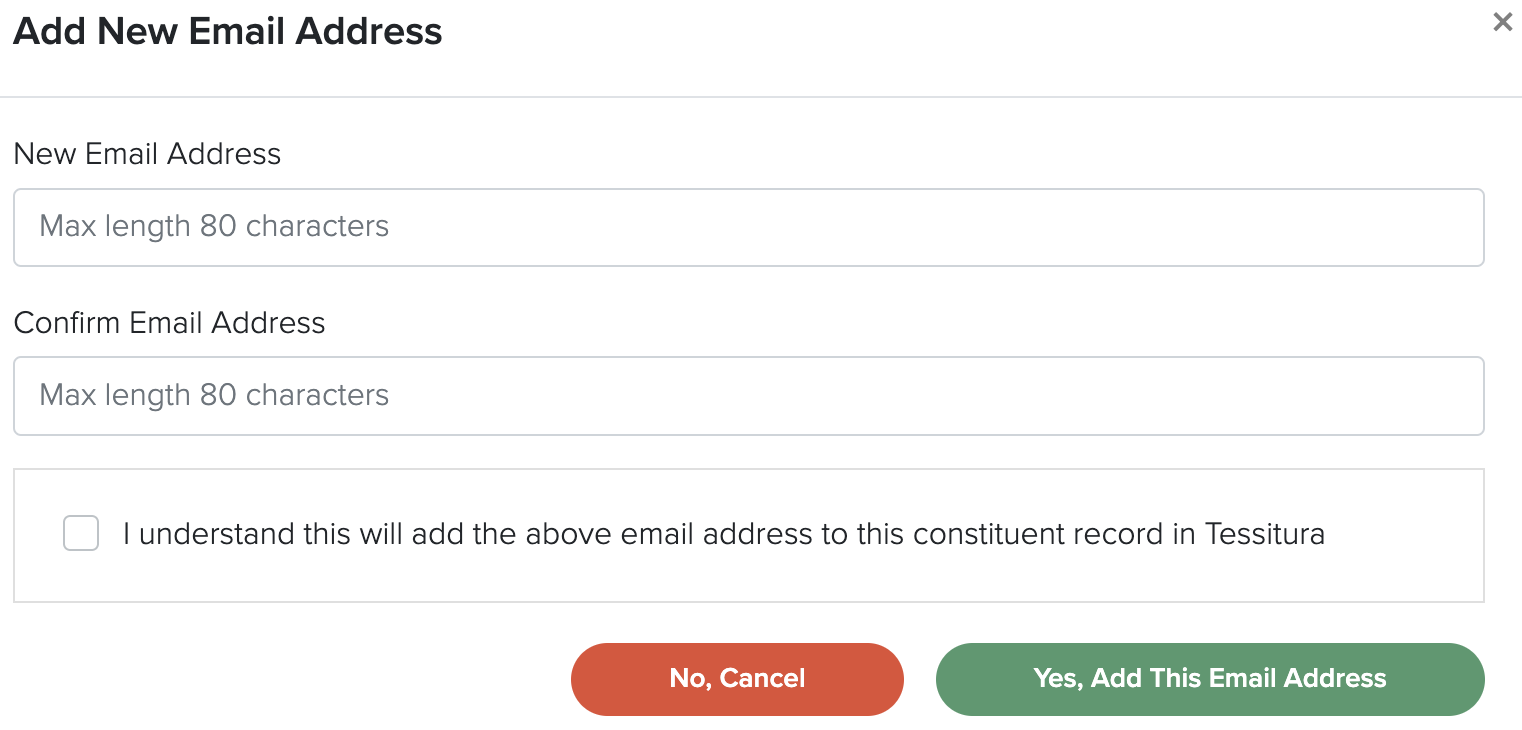
Add New Email
To add a new email address, select the Add New Email button. Type the new email address that you want to add in the appropriate fields. Confirm this email addition by checking the confirmation box and click the Add Email button. Once added, the screen will refresh with the new email already selected and you can begin selecting the appropriate preferences.
Adding a new email address will add the email to the Contact Details tab in Tessitura and will create a new contact record in Prospect2. The newly added email address will not have any preferences set by default. You can set preferences with the patrons permission under Edit Contact Preferences.
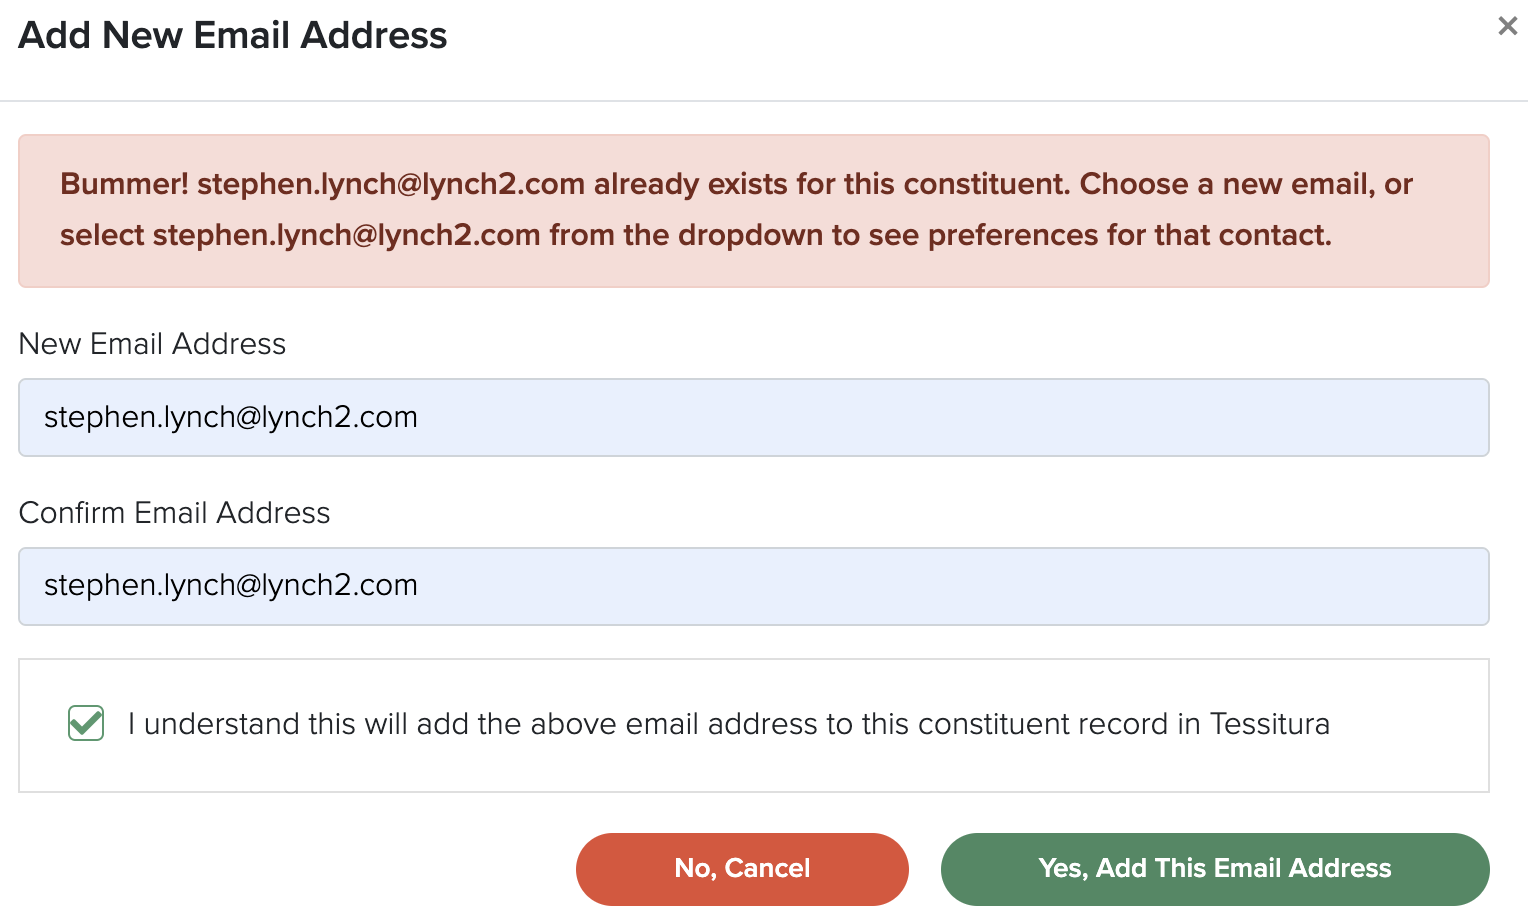
If the email address already exists in the current constituent record, you will not be able to proceed with the above changes:
If the email exists in another constituent record, you will not be able to proceed with the above changes and will be advised of secondary actions that you may take:

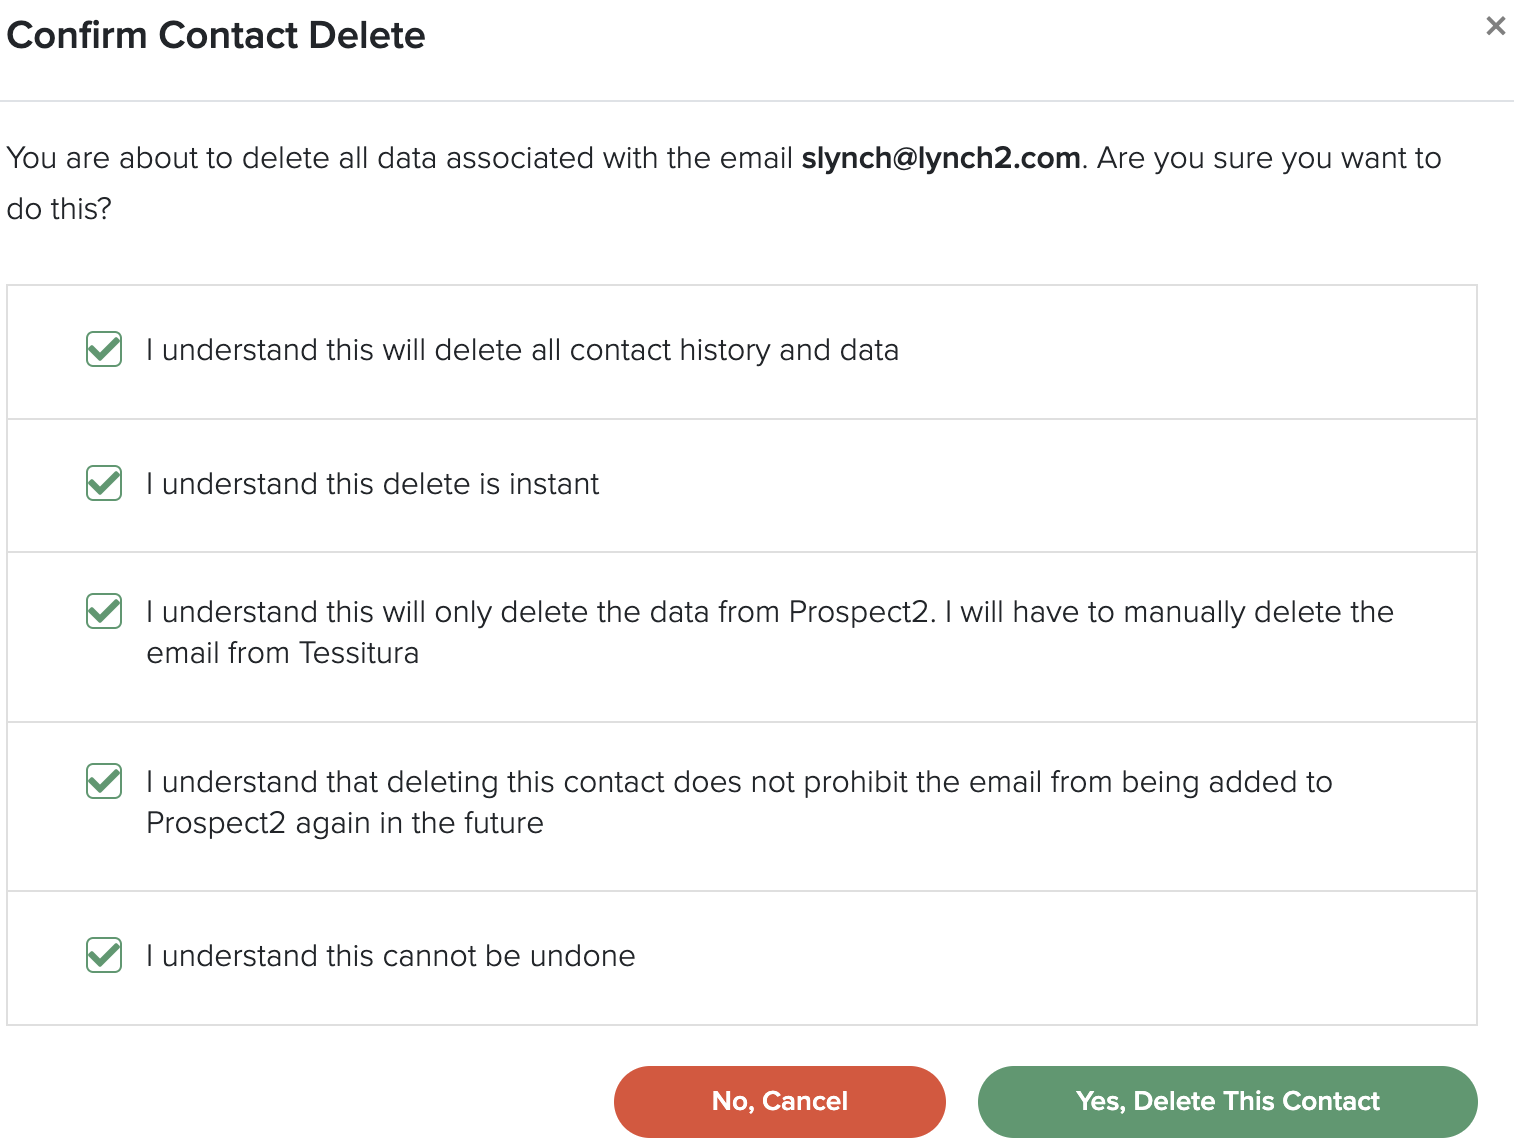
Forget this Contact
This irreversible option will completely delete the contact and all history associated with that contact from Prospect2.
Select the desired email address from the dropdown and choose Forget this Contact. Once you agree by checking the necessary boxes and clicking the Delete Contact button, the contact will immediately be deleted from your Prospect2 dashboard only. The email address will still reside in the Contact Details tab in the constituent record within Tessitura.
Debouncing Hard Bounced Email Addresses
The Custom Screen provides two distinct ways to debounce a contact in real-time. When you select a hard bounced email from the email address dropdown, an alert will appear. Prior to debouncing a hard bounced email address you must confirm validity and consent, and then you can proceed with one of the below actions. Click here to learn more about debouncing email addresses.
- Debouncing the Same Email Address: The Custom Screen is the only tool that allows you to reactivate a patron's original, exact same hard bounced email address. If the patron confirms their original email is now valid, you simply click the Debounce button to clear the bounce status immediately. An example of when this would likely be used is if the email address soft bounced for a full inbox, which turned into a hard bounce after three attempts. After the inbox side issue is resolved by the patron, this would be the next step towards the patron receiving emails at this address again.
- Debouncing via Change Email Address: You can also use the Custom Screen to debounce a contact by changing their email to a new, different address. Clicking the Change Email Address button and following the steps to change the email will also immediately clear the hard bounce status from the record. An example of when this would likely be used is if an email address was typed wrong, like a .con instead of .com.
Updating a Prospect2 integrated SMS phone number phone number on the Custom Screen will update the number for the constituent record you are accessing for the phone type specified in T_DEFAULTS, as well as update the "Phone" field within the associated contact record in Prospect2. This field will only be available when viewing the Primary Email address on the Custom Screen.
The phone number will only be added/updated for the constituent record being accessed, so in the event the edited email address exists on multiple constituent records in Tessitura, you may want to institute a practice of updating the phone for the alternate constituents where applicable.

Edit Contact Preferences
Contact preferences are set through two methods: Lists and Tags.
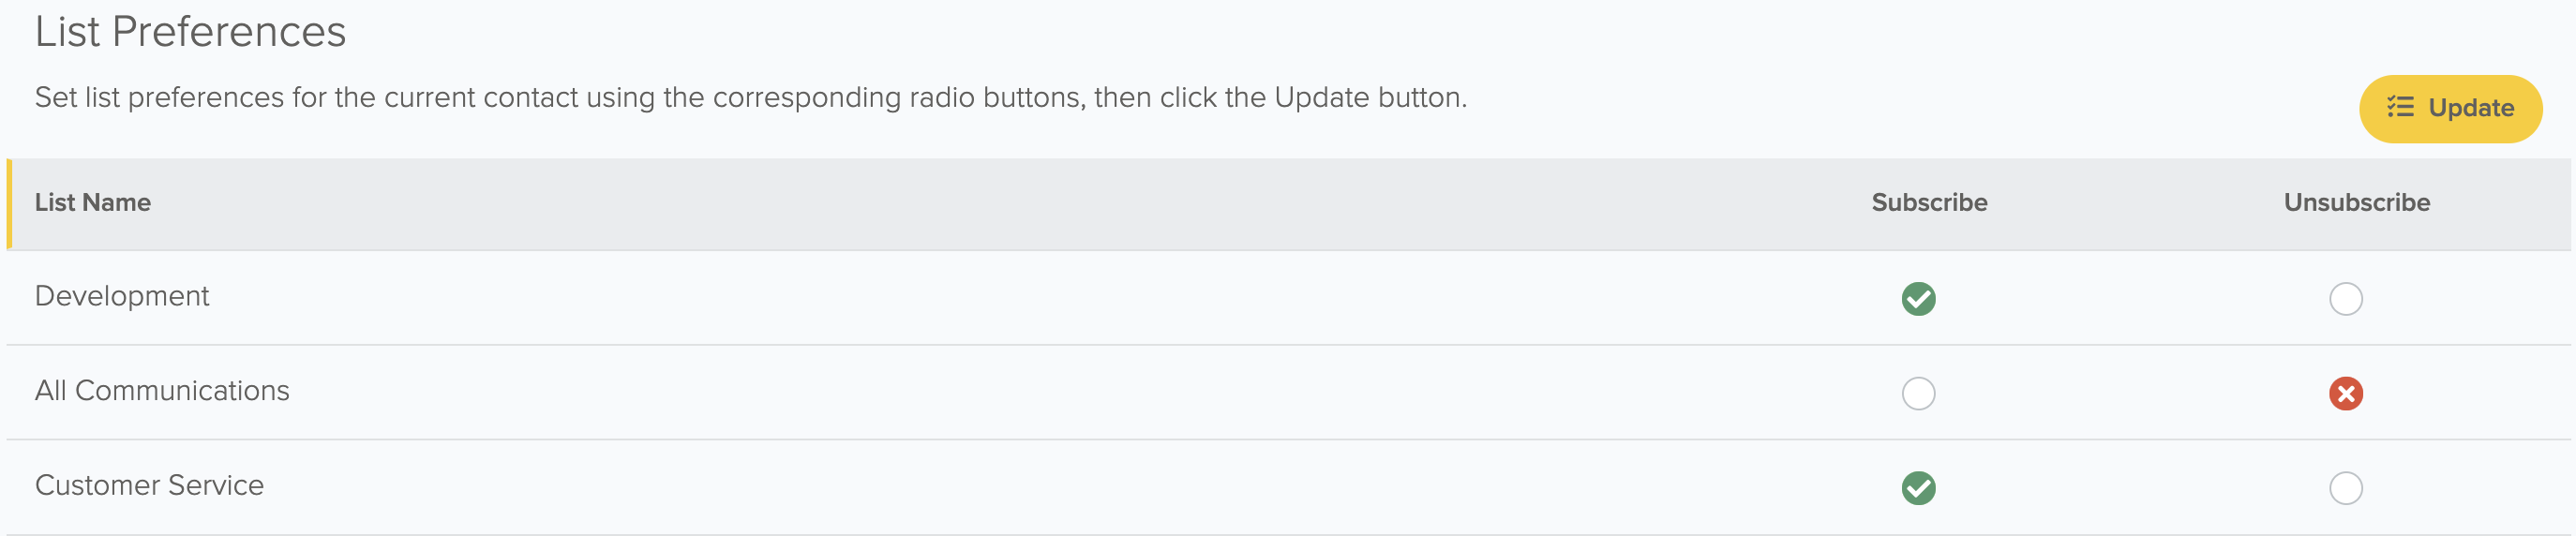
Lists
All of your Prospect2 lists will display on the Custom Screen. Subscribe or Unsubscribe an email address to a list by selecting the “Subscribe” or “Unsubscribe” radio button next to the list in question and then select Update Lists. If neither “Subscribe” or “Unsubscribe” has a radio button selection, the contact currently does not have a preference assigned to them.
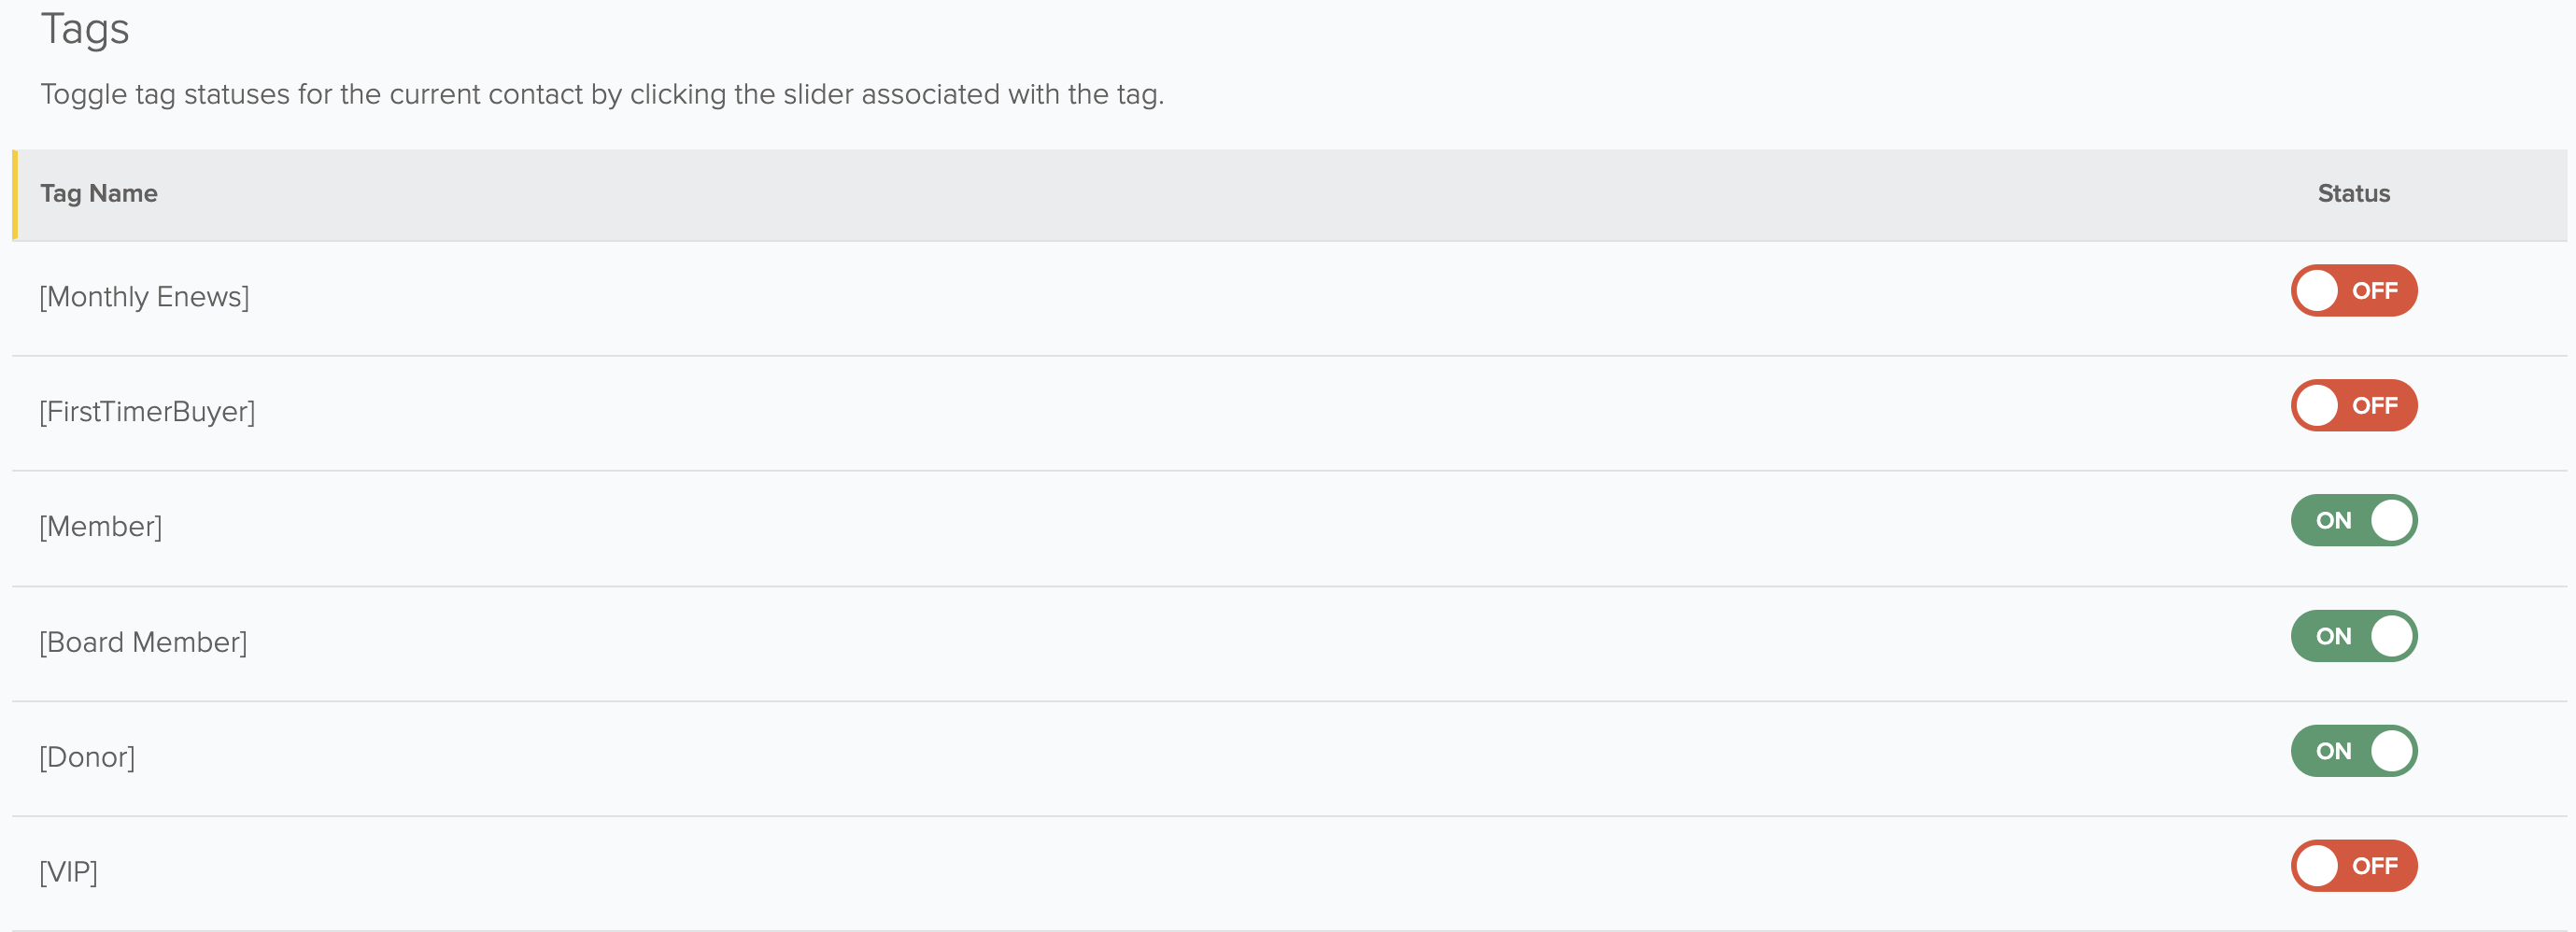
Tags
There are a variety of ways to utilize tags, whether to indicate a preference or to trigger specific actions, the Custom Screen allows tags to be turned ON or OFF for an email address. Since tags are a used across a wide range of areas and processes in your Prospect2 dashboard, the Custom Screen will only display tags that begin with a straight bracket [ . Keep this in mind when creating your [tag library].
History
This provides you with insight to your patrons’ past Standard Campaigns, Automations, and Action history. The sections are not intended to replace the reporting and history available within your Prospect2 account. This data is displayed on the Custom Screen to help the box office, patron services, or other members of your organization who may be having conversations with patrons about an email or other recent Prospect2 generated interaction.
Campaign History (Standard Campaigns):
Standard campaigns sent to the email address, that an action was taken on, will display with a summary of activity next to it. Actions include open, click, unsubscribe or hard bounce. Only campaigns where an action was taken will display in this section. For example, if a campaign was sent but not opened or hard bounced, it will NOT display in this section. You can review the content of a campaign that displays in this section by clicking the title. You can also 'Resend' a campaign to the email address by clicking the blue envelope located to the left of the title.
Automation History:
Automations that the email address has entered will display under ‘Automation Name’. If your Automation included an email action, you can review the email by clicking on the title below 'Messages'. If an action was taken on the automation email, such as open, clicked, unsubscribed, or hard bounce, the action will be indicated next to the message name. If your Automation does not contain an email action, nothing will display under Messages.
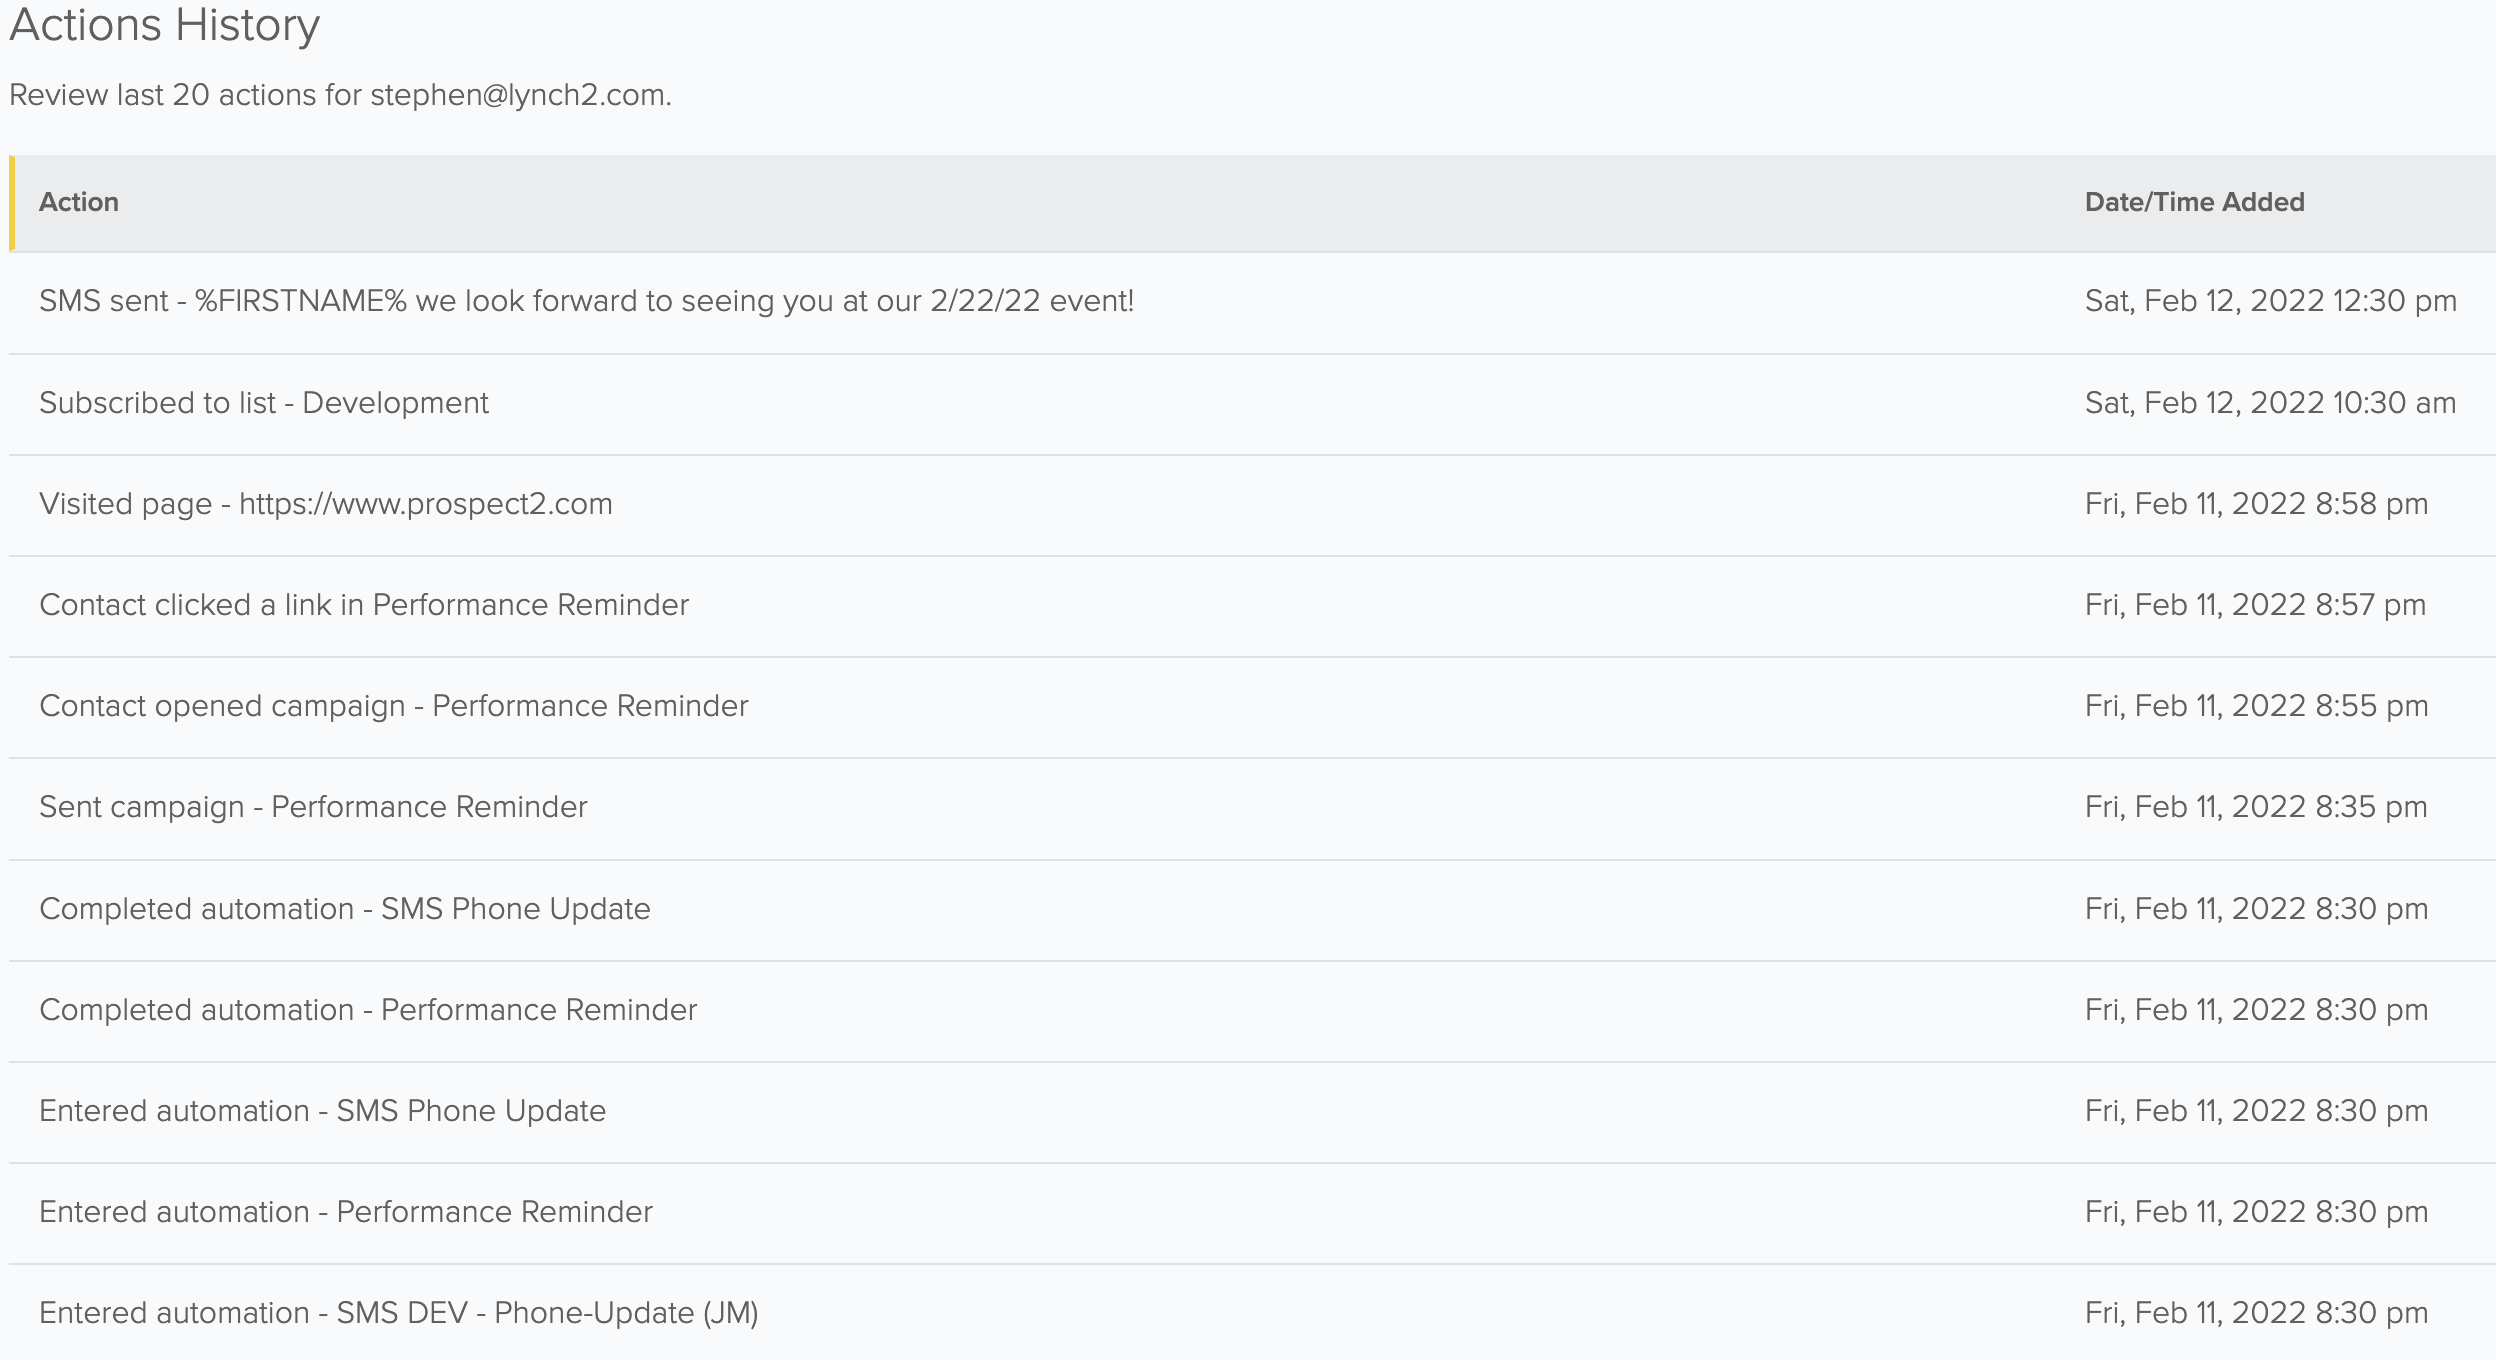
Actions History:
The last 20 actions taken by the email address are displayed with a timestamp of when they occurred. Actions are defined as:
SMS Messages (personalization tag values will not display) Subscription to list Unsubscribe from a list Received a Campaign Campaign Click Site Visit Entered Automation Completed Automation