Generating Customer Service Issues with Prospect2
Prospect2 offers a variety of ways to generate a Customer Service Issue (CSI) in Tessitura. Two common use cases for this are processing cancelations and taking action on patron feedback. You can generate a CSI at any point in an automation, so you have a lot of flexibility! We have outlined a few ways you can use this below.
Triggering CSIs with Link Actions
Create a Campaign & Add Link Actions
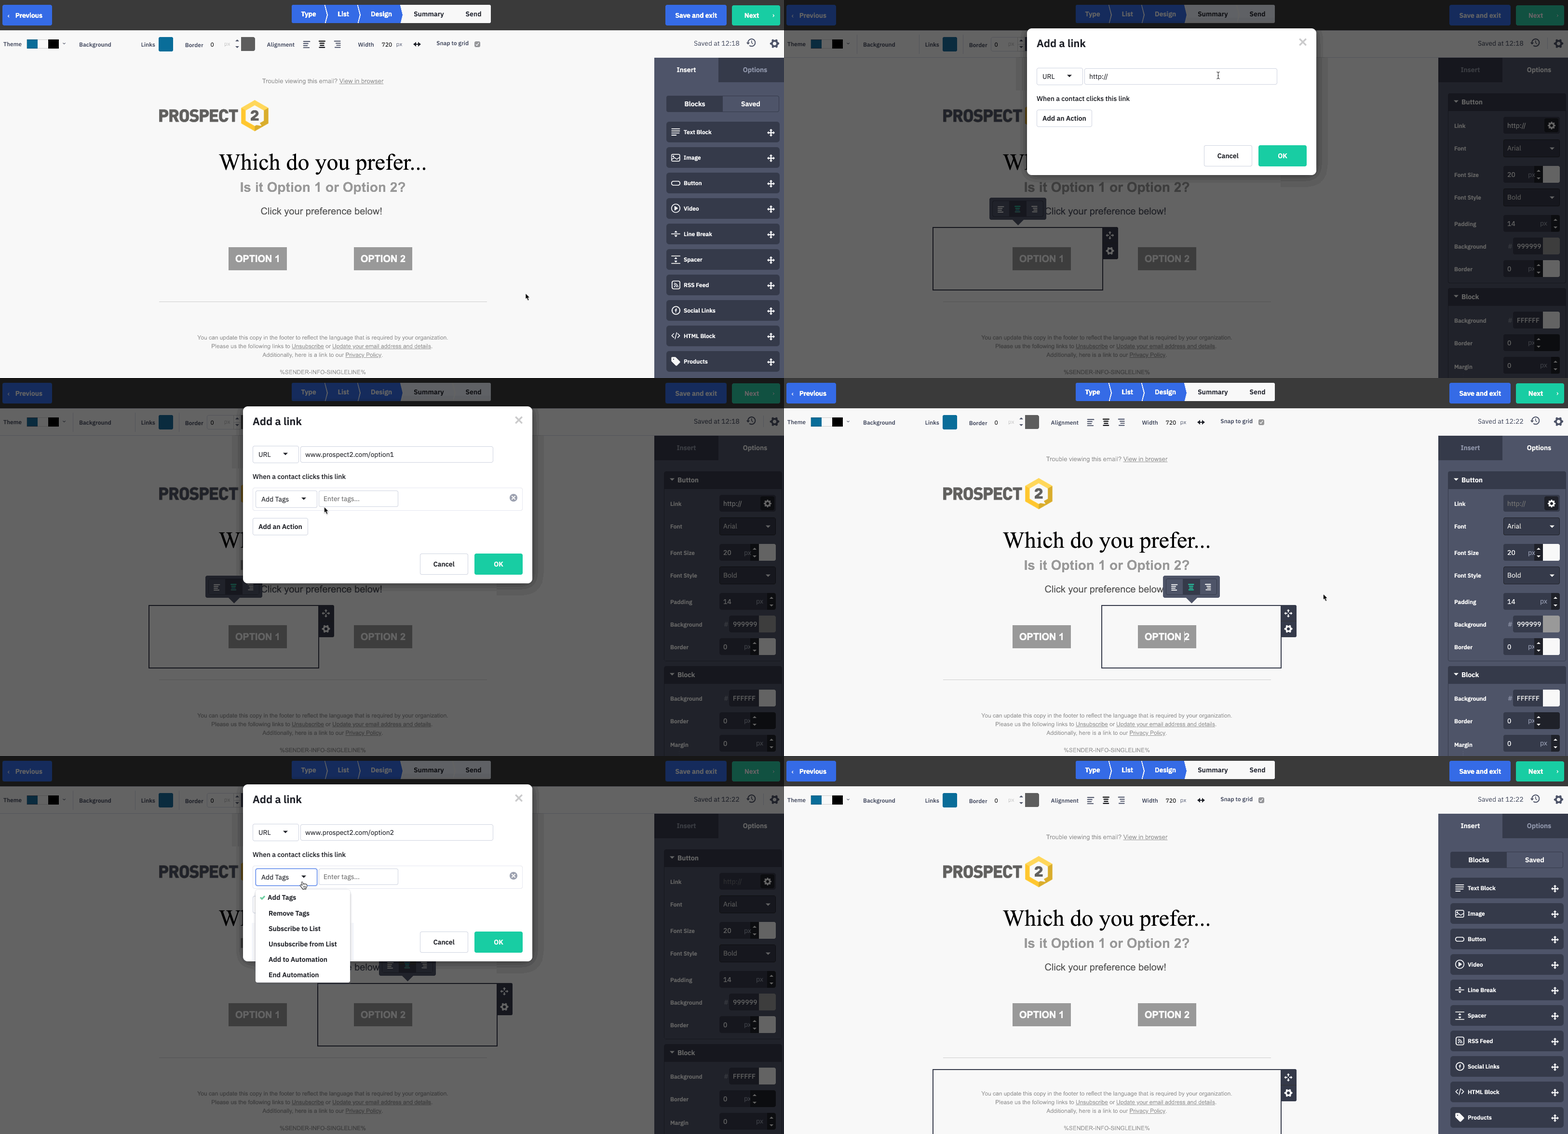
Link Actions can be applied to any URL that you include in an email campaign created in Pro2.
In this example we are including a Link Action that will apply a Tag at time of link click. You can set up multiple link actions for each option you may present to your Patrons.
Create your CSI
In your Tessitura Integration Dashboard, navigate to Additional Features and click on Customer Service Issues. Here is where you’ll create a new CSI form. If you want to generate CSIs with unique Activity Types based on specific link clicks, you must create the individual Activity Types in Tessitura prior to setting this up. Creating individual Activity Types will simplify the process when you are generating reports in Tessitura for each Activity Type defined.
Create your Automation(s)
SINGLE OPTION:
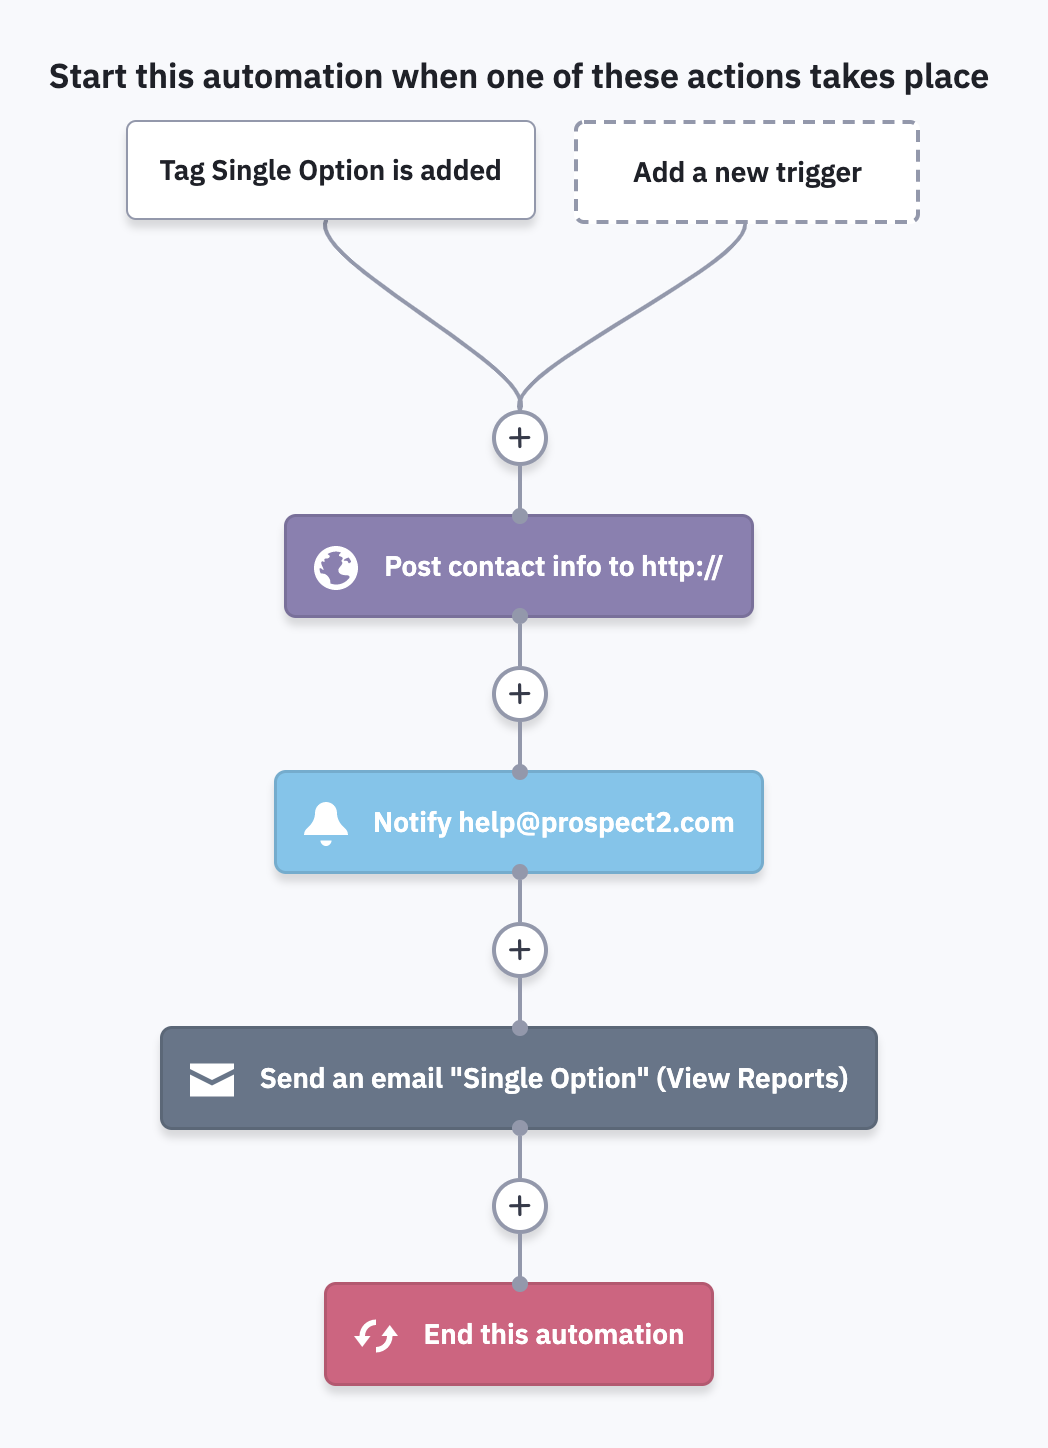
If you include a single Link action in your campaign, you will set up one Automation that will trigger the CSI. The Automation will include a trigger of Tag Added. The Tag in the trigger should correspond with the Tag that you defined in the Link Action.
 Next, you will add a Webhook Action and paste in the CSI URL which can be obtained from the CSI you created in your Prospect2 Integration dashboard.
MULTIPLE OPTIONS:
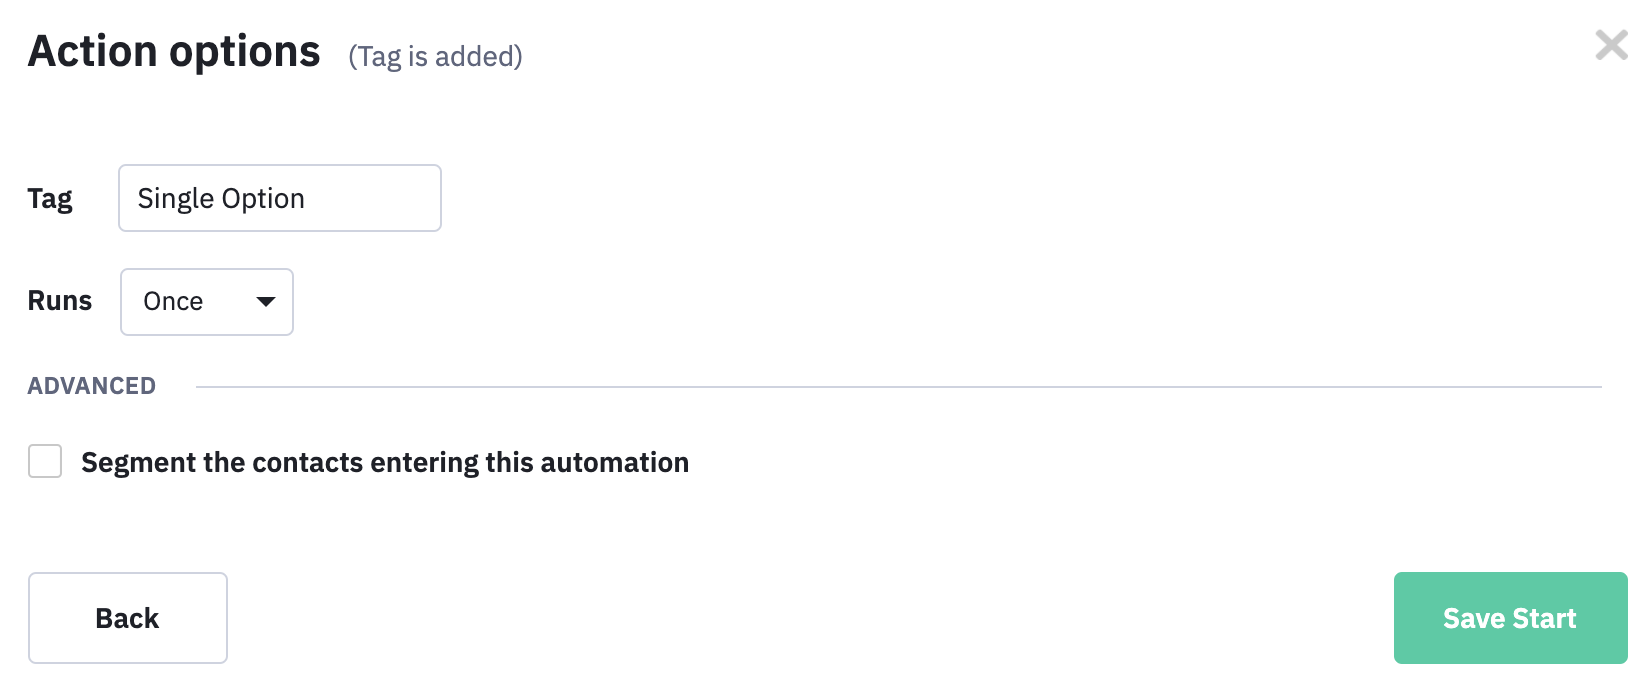
If you include Link Actions for multiple options within a single campaign that will generate CSIs with unique Activity Types in Tessitura, set up separate Automations that include the corresponding CSI URLs.
 Each automation will be defined with a trigger of Tag Added. Tags defined within the trigger should correspond to the tag that you’re applying via the Link Action.
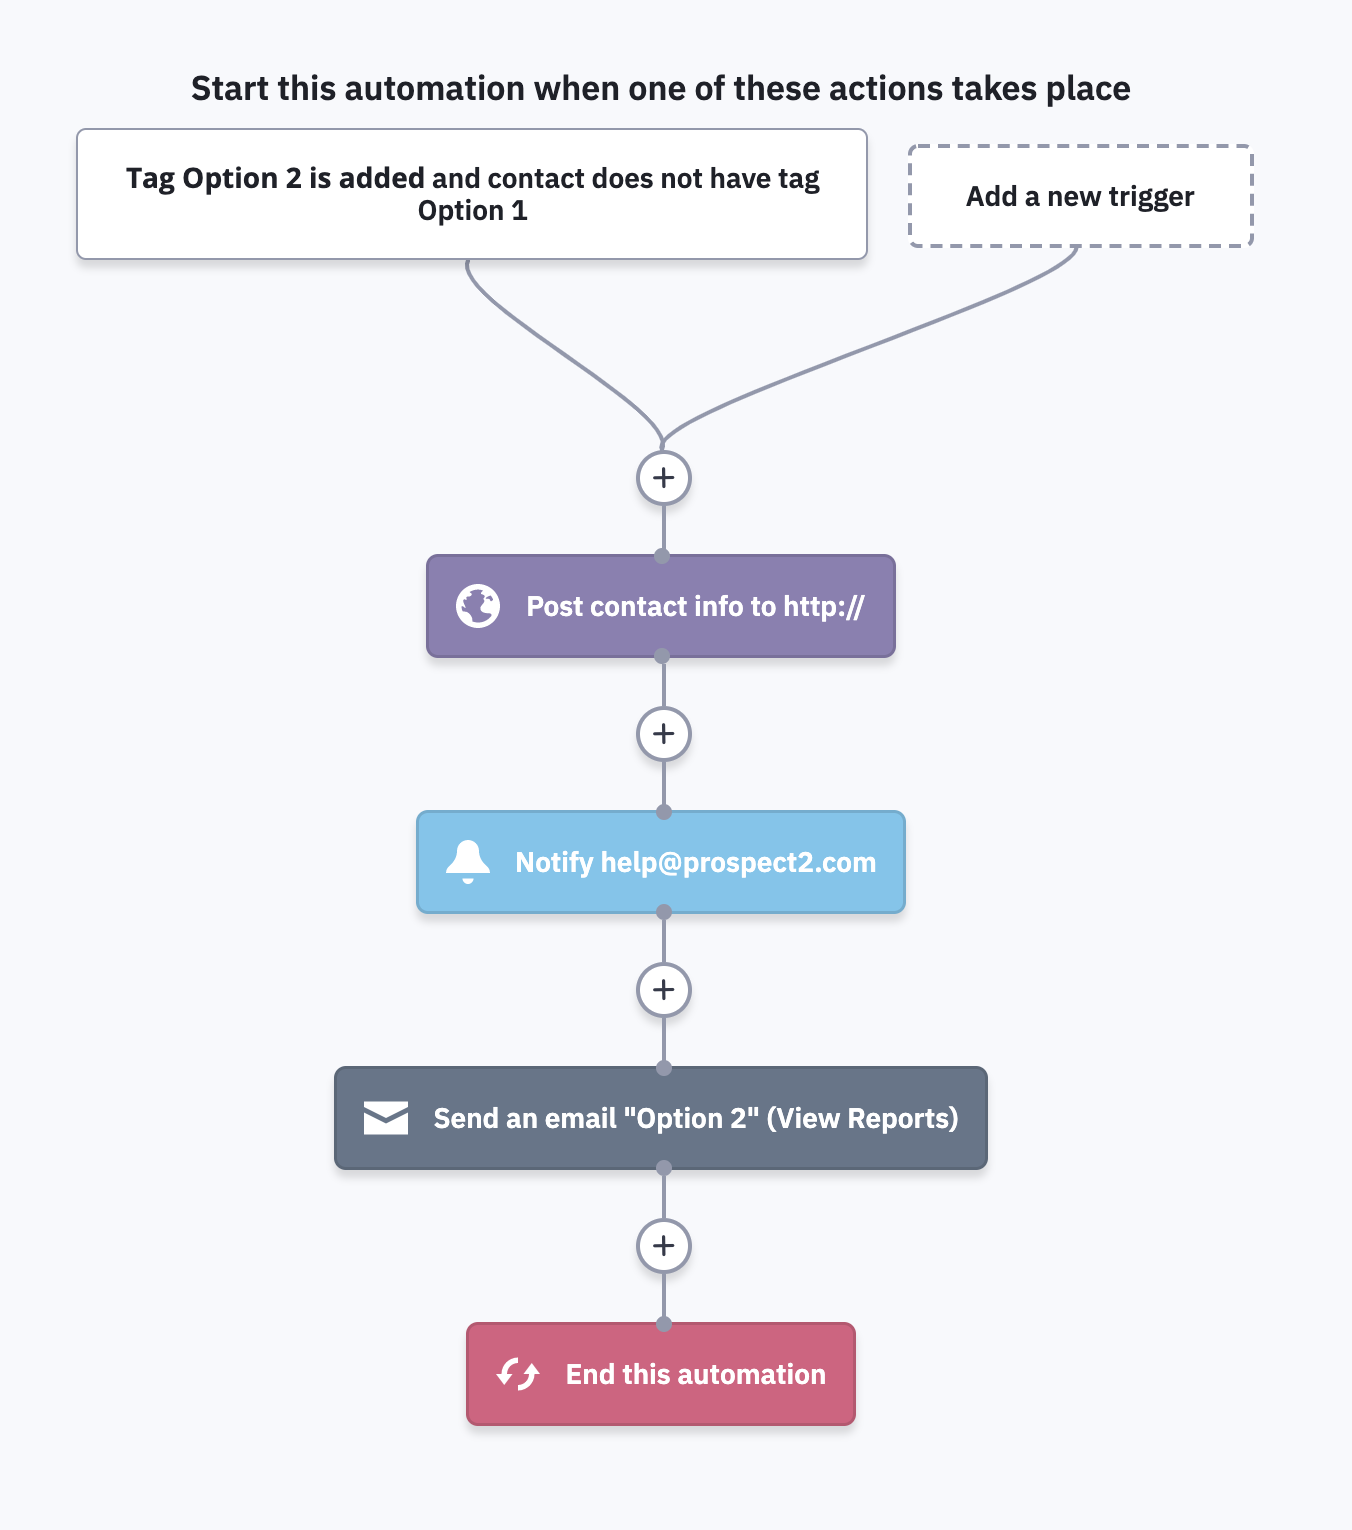
For example, if you have an Activity Type of Option 1 and another for Option 2, you will create two automations, one with a trigger of Tag Added: Option 1 and another with a trigger of Tag Added: Option 2.
Option 1 Automation:
Option 2 Automation:
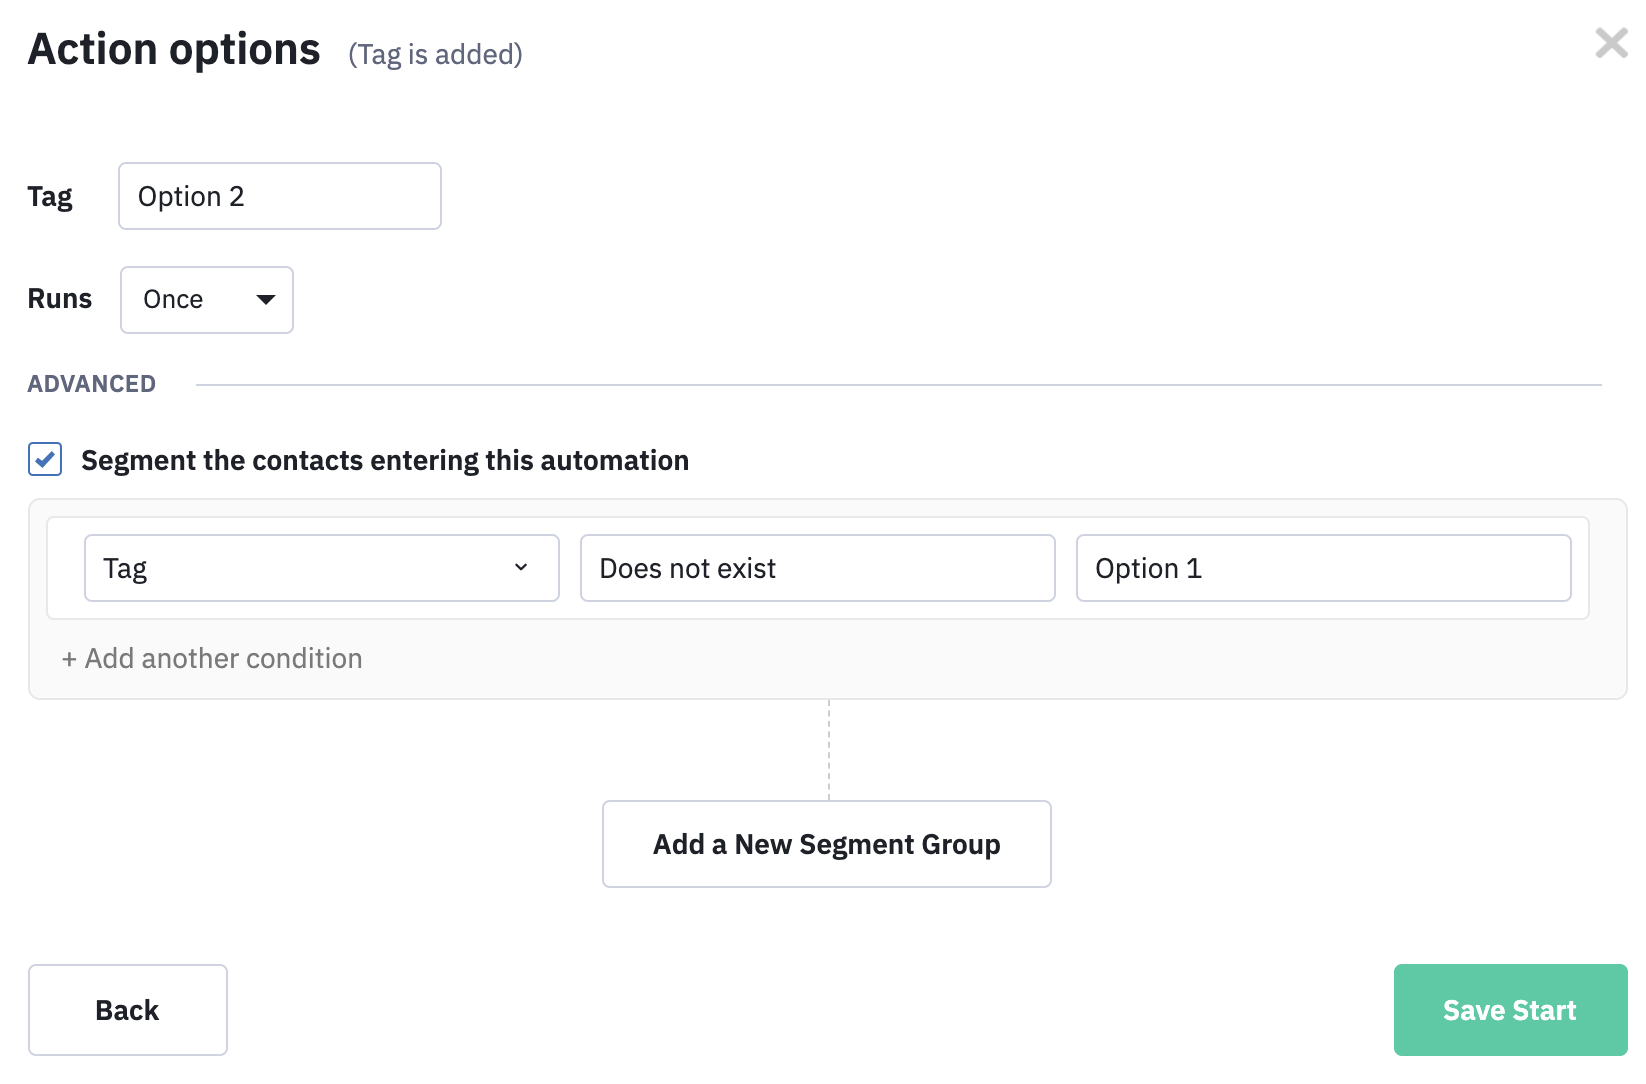
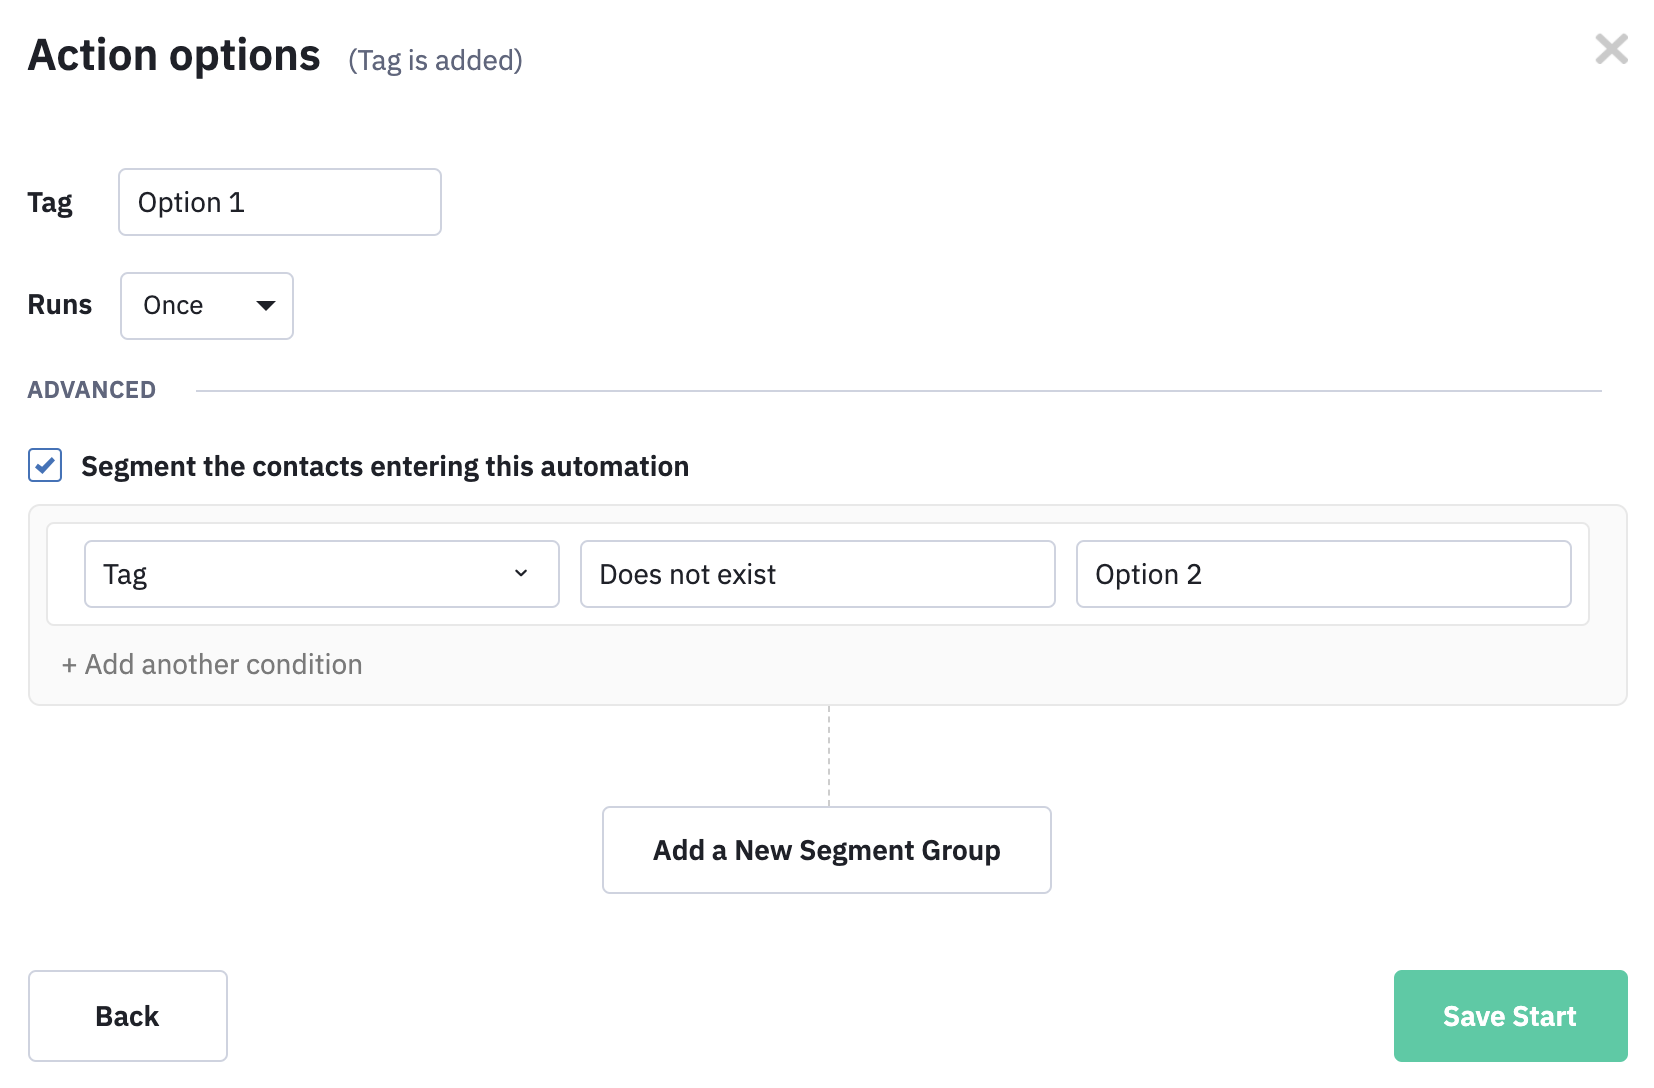
For example in an automation that has a trigger of Tag Added > Option1, apply additional segmentation in the trigger that states Tag Does Not Exist Option 2. This would prevent contacts from entering the automation if they already clicked the Option 2 button, and then decided to click Option 1. You'd set up similar segmentation for the Option 2 automation so you can exclude those who already selected Option 1 from entering the automation which will prevent a second CSI from being generated.
ADDING TO YOUR AUTOMATIONS:
What is outlined above is all you need to generate a CSI in Tessitura from a Link Action in an email. Automations are flexible and customizable, allowing you to add on other communication, like an email acknowledgement of the selection the patron chose. If for some reason the patron clicked on the wrong option or changed their mind, a confirmation email lets them know what steps your organization is taking. In this confirmation email you could direct them to contact your organization's call center or box office where a representative could assist the patron and easily adjust the CSI that was created.
Triggering CSIs via Inline Form Responses
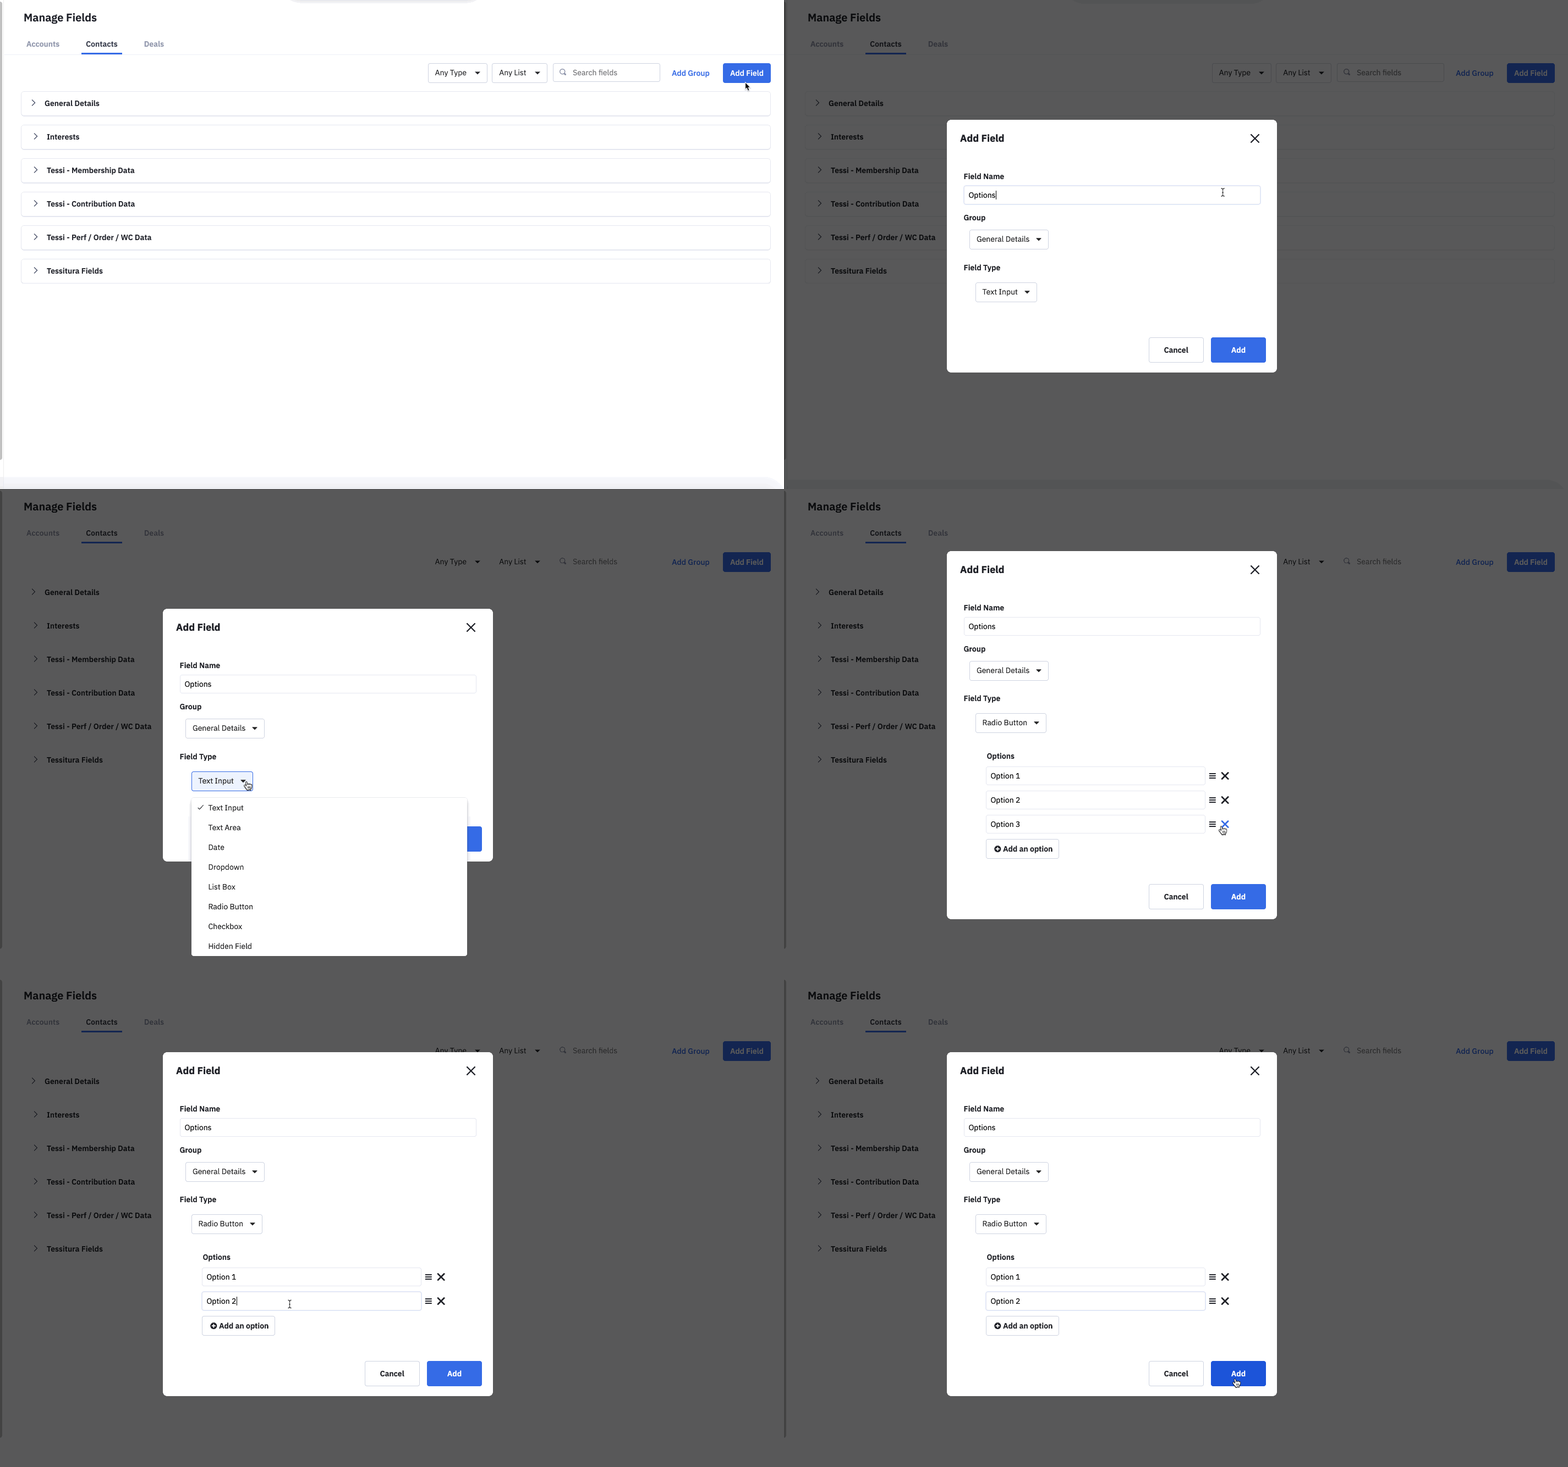
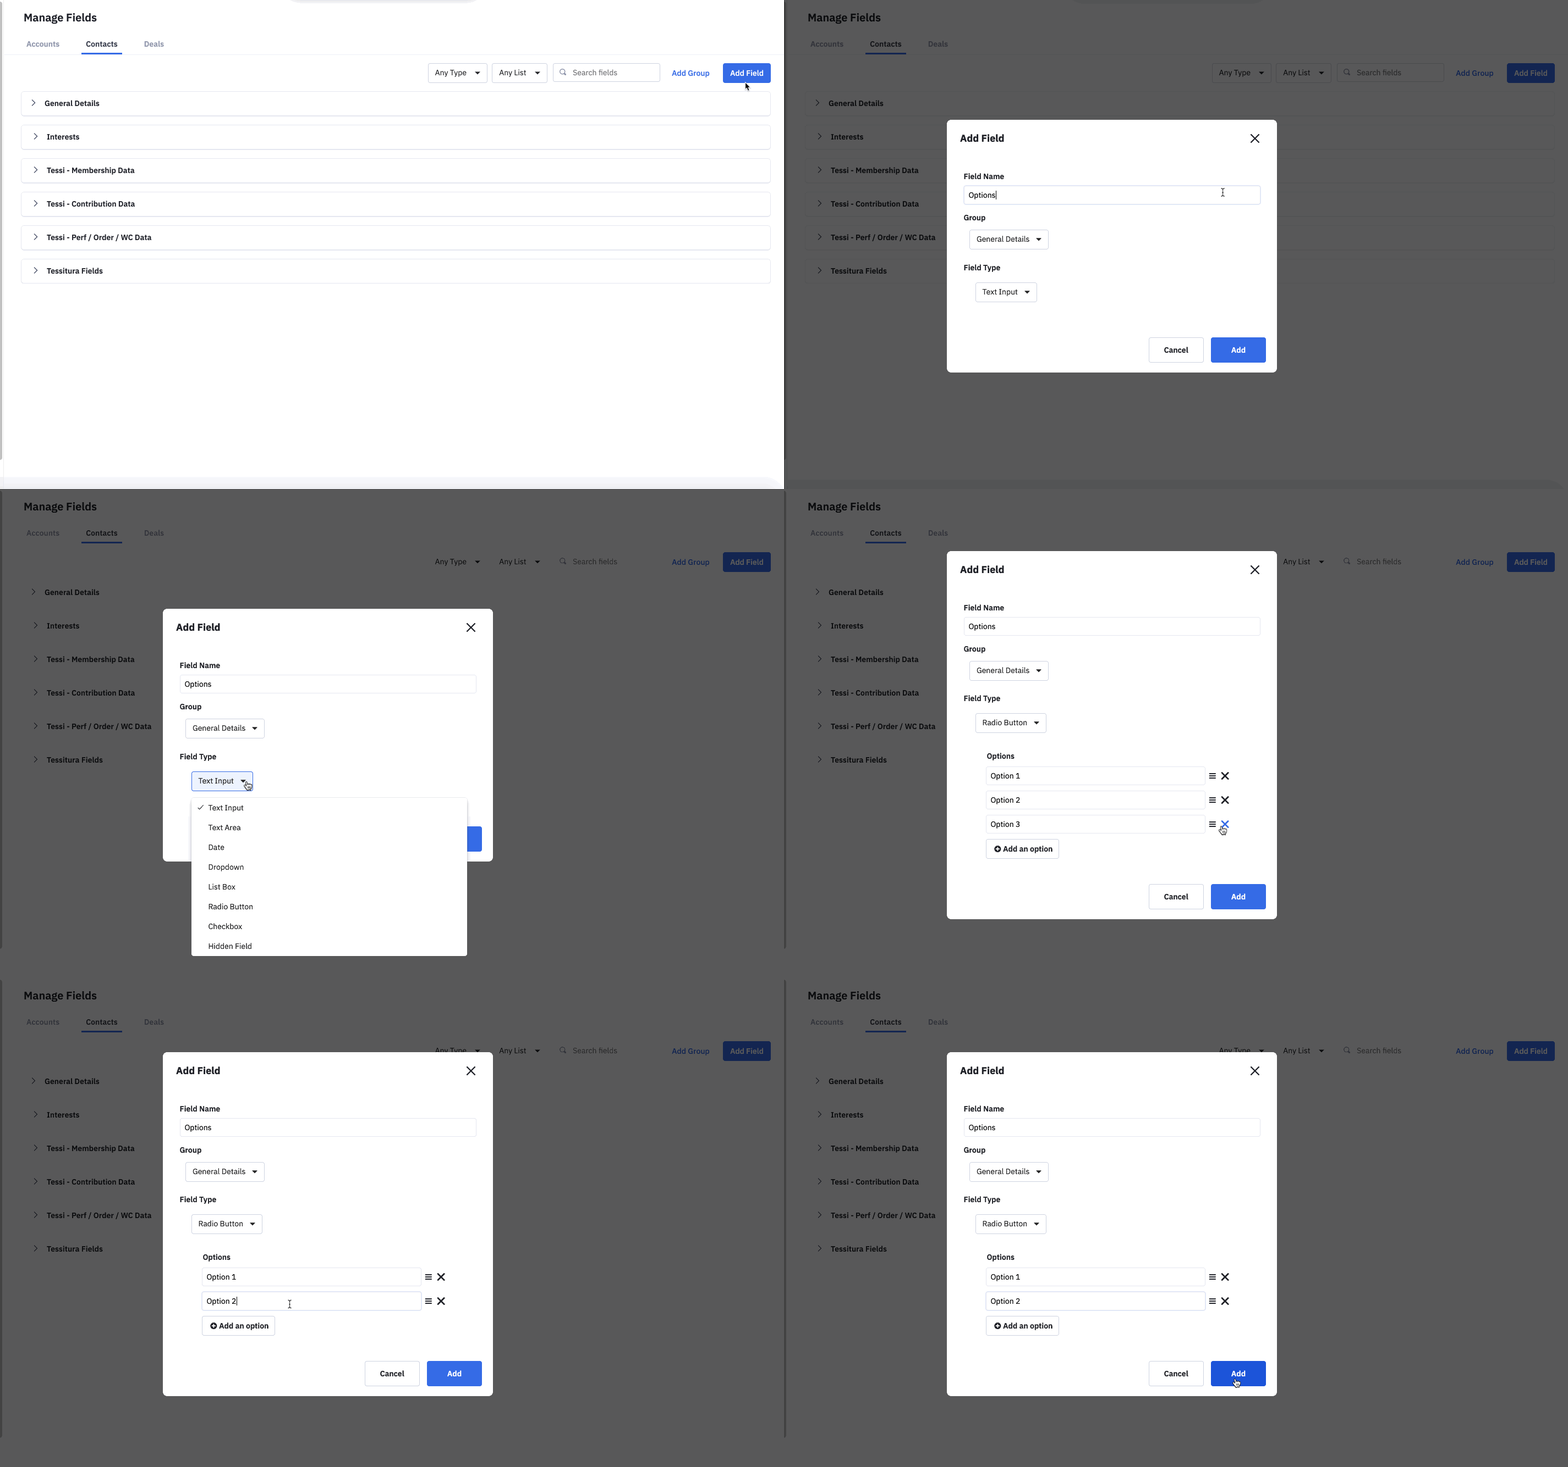
Create a Custom Field
In your Pro2 Dashboard, navigate to the Manage Fields page.
Create a Dropdown or Radio Button custom field type. This makes sure a patron can only select a single option when filling out the form.
Create an Inline Form
When creating your form you will need to include least one action. This action is where you can add a unique tag that will be added to contacts once they submit the form. Additionally you can choose to send a notification to an internal email address every time the form is submitted.
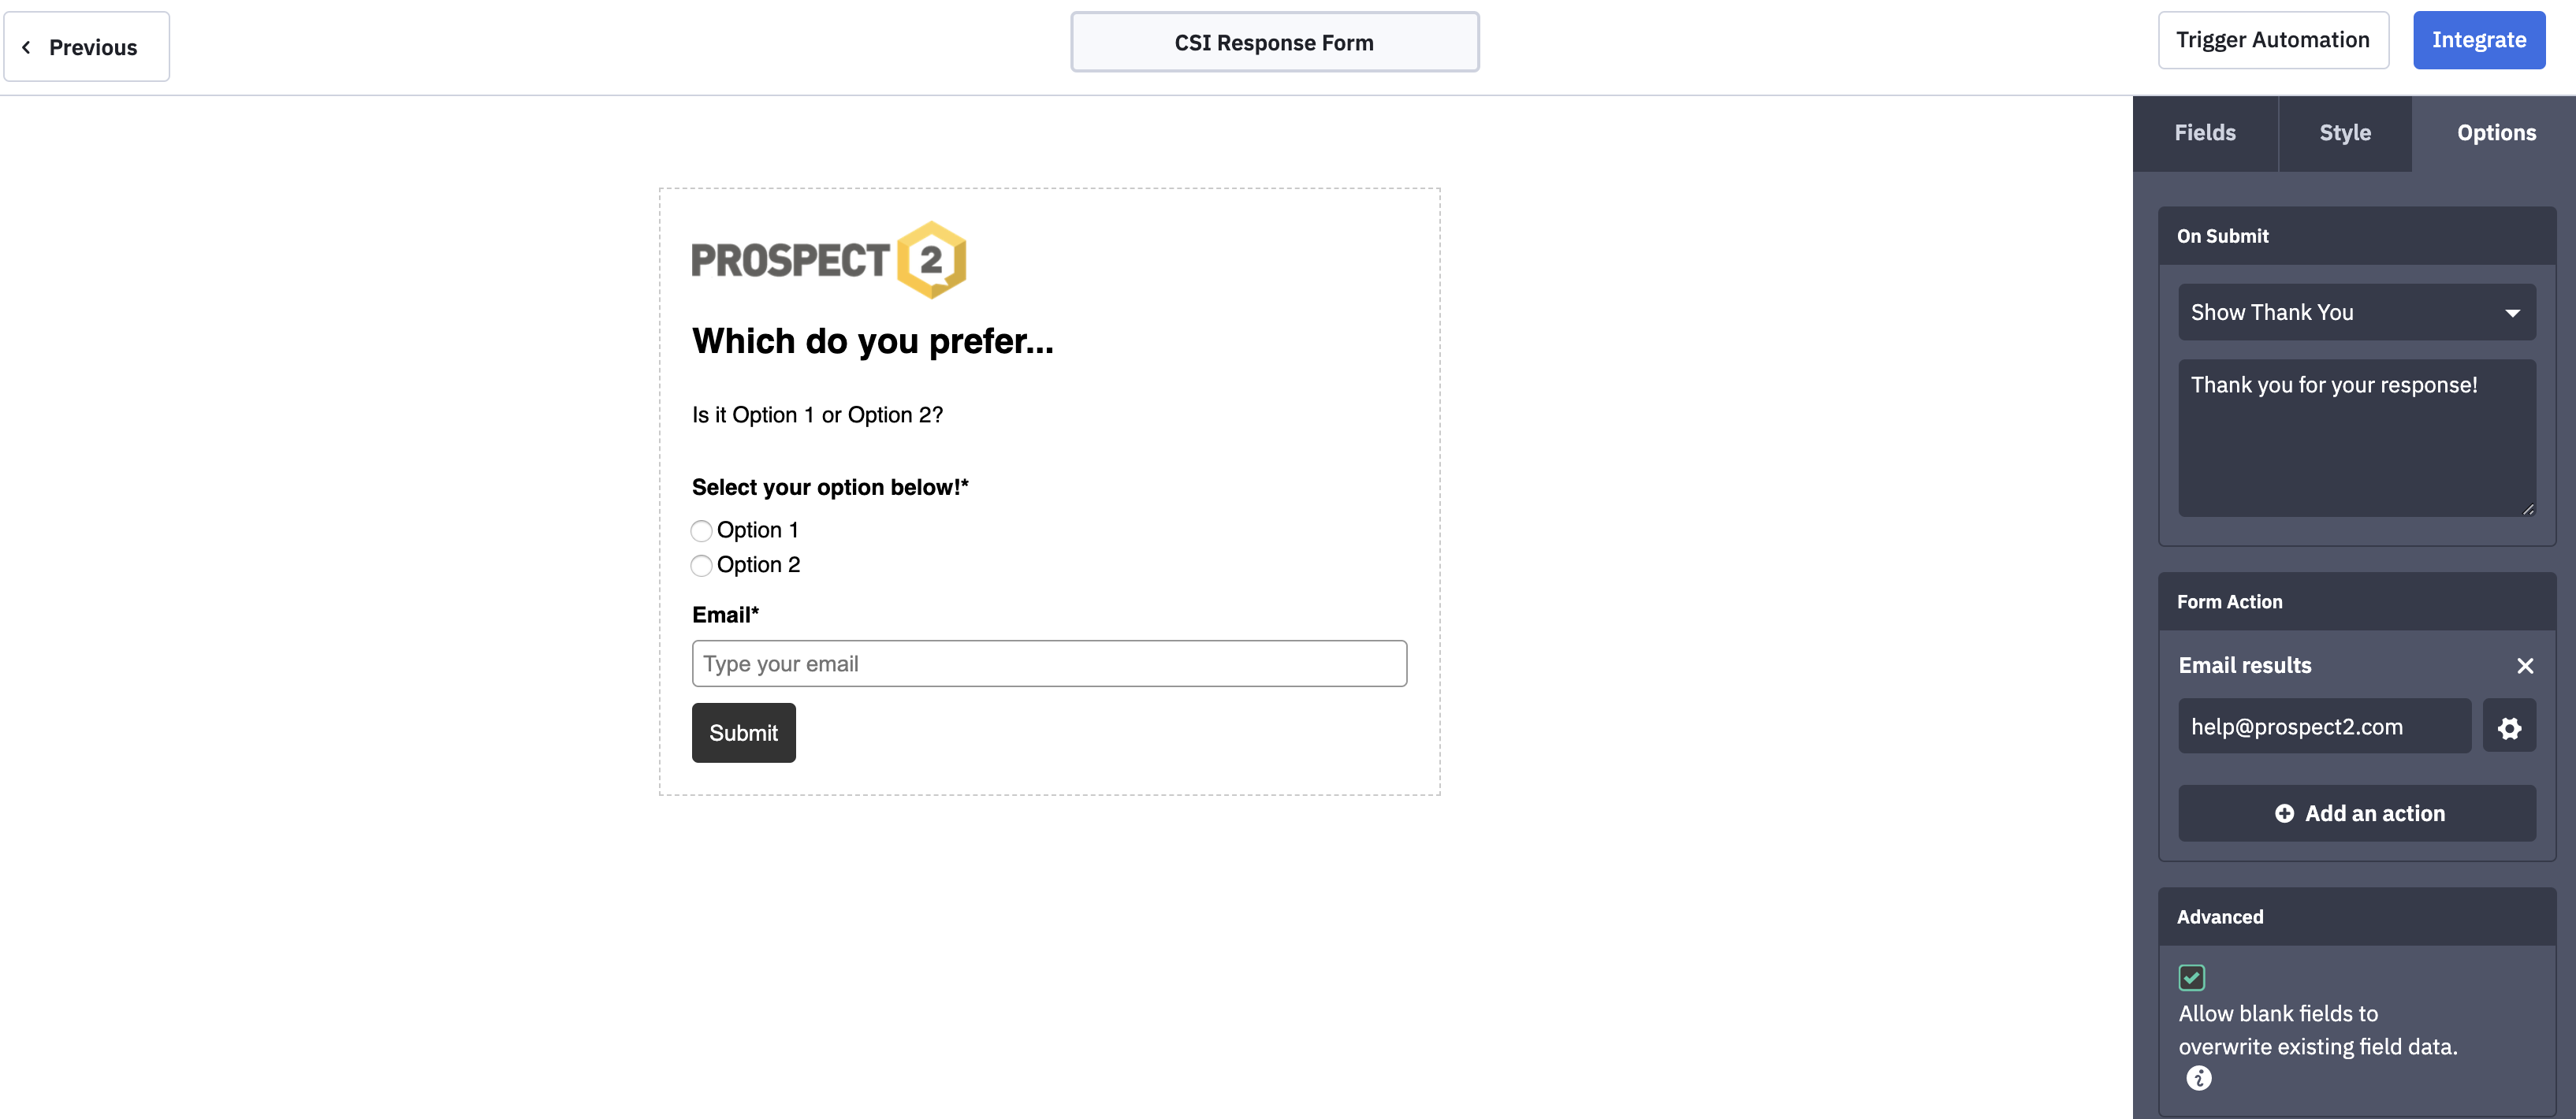 Once you are in the form editor, style the form as desired and most importantly, include the custom field created in Step 1 as a required field, along with any other fields you wish to include.
 Once your form is created, copy LINK from the forms Integrate page. This link will be used in your communication, which we cover below.
Create a Custom Field
Include a link or a button in your campaign that will direct patrons to the inline form you created in Step 2.
If you included additional fields in the form, you can use URL parameters to autofill information for patrons if it already exists in Pro2.
Original Form Link:
http://www.prospect2.com/option1
FORM LINK WITH A PARAMETER THAT WILL AUTO POPULATE EMAIL ADDRESS:
http://www.prospect2.com/option1?email=%EMAIL%
As you will see, we entered a custom field name of email= and included the personalization tag for Email. If you are including additional fields in your form, such as full name and wish to have this field auto-populated as well, you’d simply add an additional parameter to the URL.
http://www.prospect2.com/option1?email=%EMAIL%&fullname=%FULLNAME%
The format always starts with ?[FieldName1]=%PERSONALIZATION-TAG-1%. Any additional fields will directly follow the personalization tag ahead of it with an amperstamp &.
http://www.prospect2.com?[FieldName1]=%PERSONALIZATION-TAG-1%&[FieldName2]=%PERSONALIZATION-TAG-2%&[FieldName3]=%PERSONALIZATION-TAG-3%
Create your CSI
In your Tessitura Integration Dashboard, navigate to Additional Features and click on Customer Service Issues. Here is where you’ll create a new CSI form.
We suggest creating unique CSIs activity types for each option that you are presenting to your patrons. This will make it easier to quickly generate reports in Tessitura based on the specific Activity Types. If you would prefer, you can use one CIS and select personalization tags to be included on the notes field to indicate the patrons selection.
Create your Automation
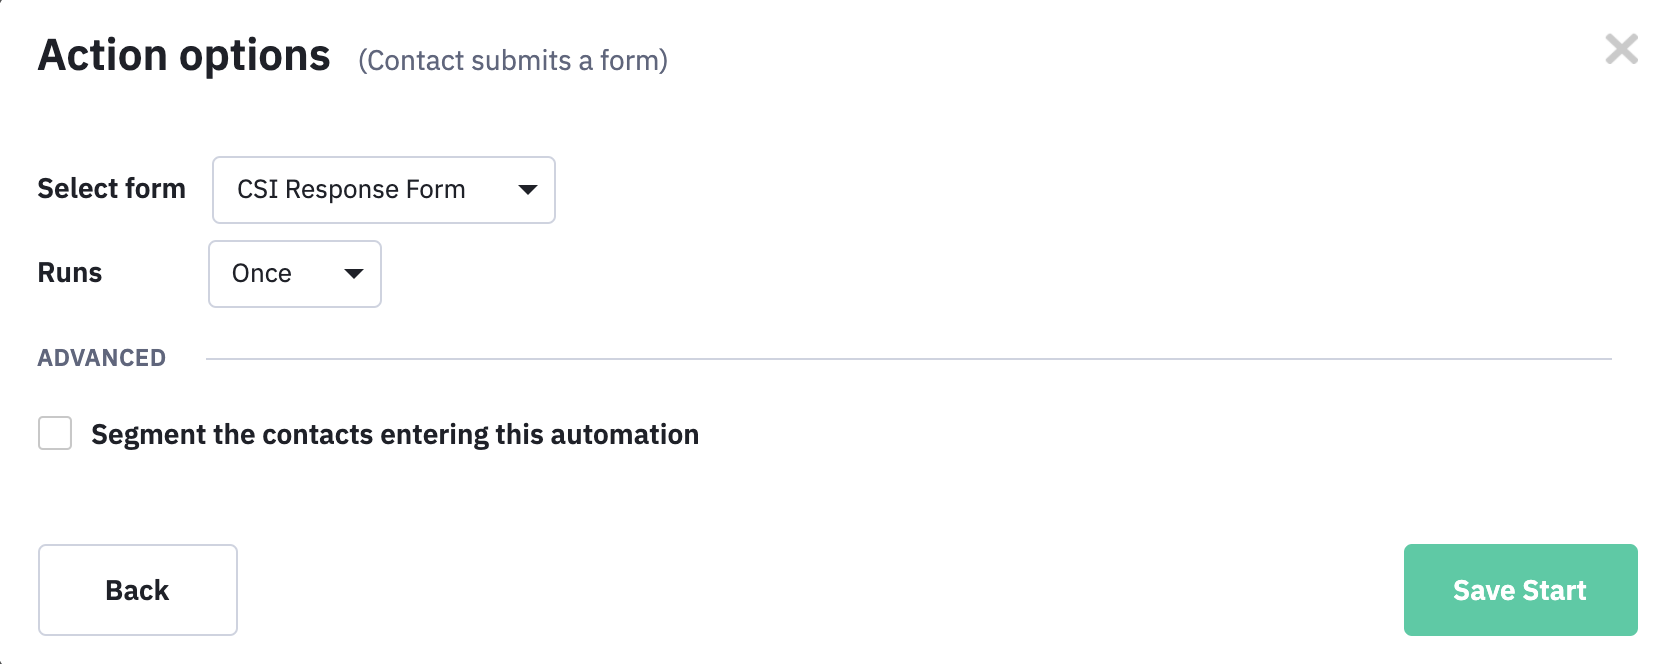
The trigger of this automation will be set to enter contacts upon the form submission. If you want to capture one option per contact, you’ll need to set this automation to run only ONCE per form submission/contact. If the trigger is set to run MULTIPLE, CSIs would be generated in Tessitura each time the patron completed the form.
Trigger: Form Submission
Select the form you created.
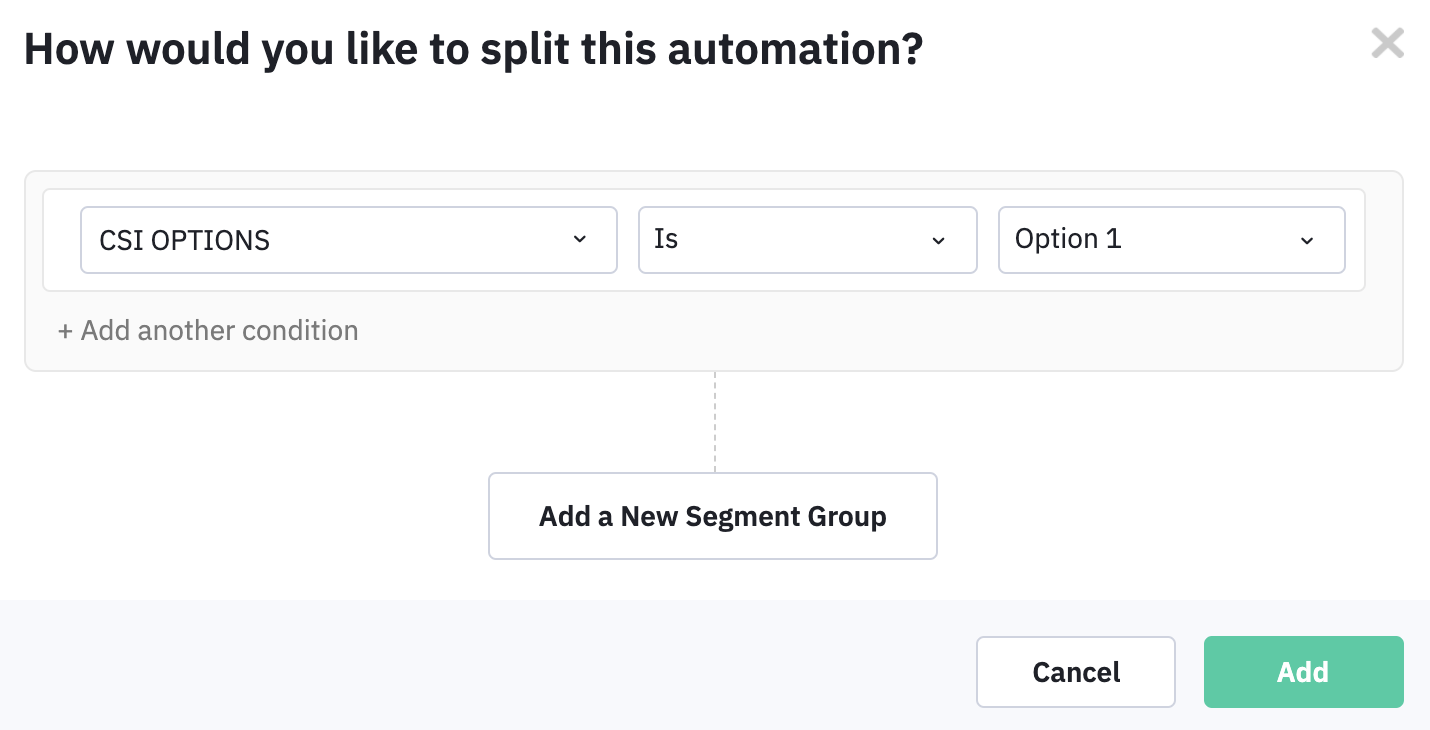
IF/ELSE - Option 1
Select the Radio Button or Drop Down field you created and select the first option. This will send contacts down the YES path if they have the value that is defined in this IF/ELSE action.
The corresponding CSI Webhook URL should be placed in the YES path after this action.
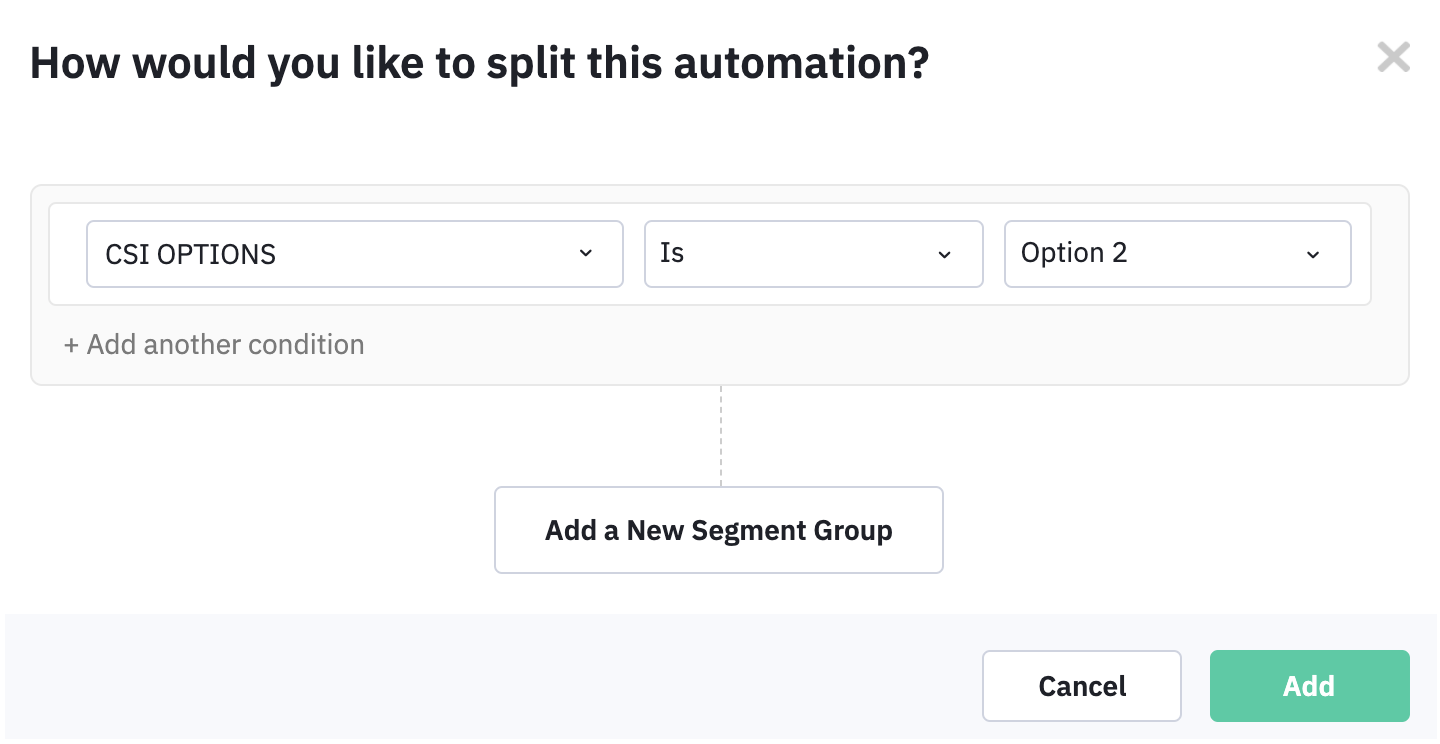
IF/ELSE - Option 2 Check
This will be placed in the NO path after the first IF/ELSE action. Select the Radio Button or Drop Down field you created and select the second option. This will then send contacts down the YES path if they have the value that is defined in this IF/ELSE action.
The corresponding CSI Webhook URL should be placed in the YES path after this action.
Full Automation Layout:
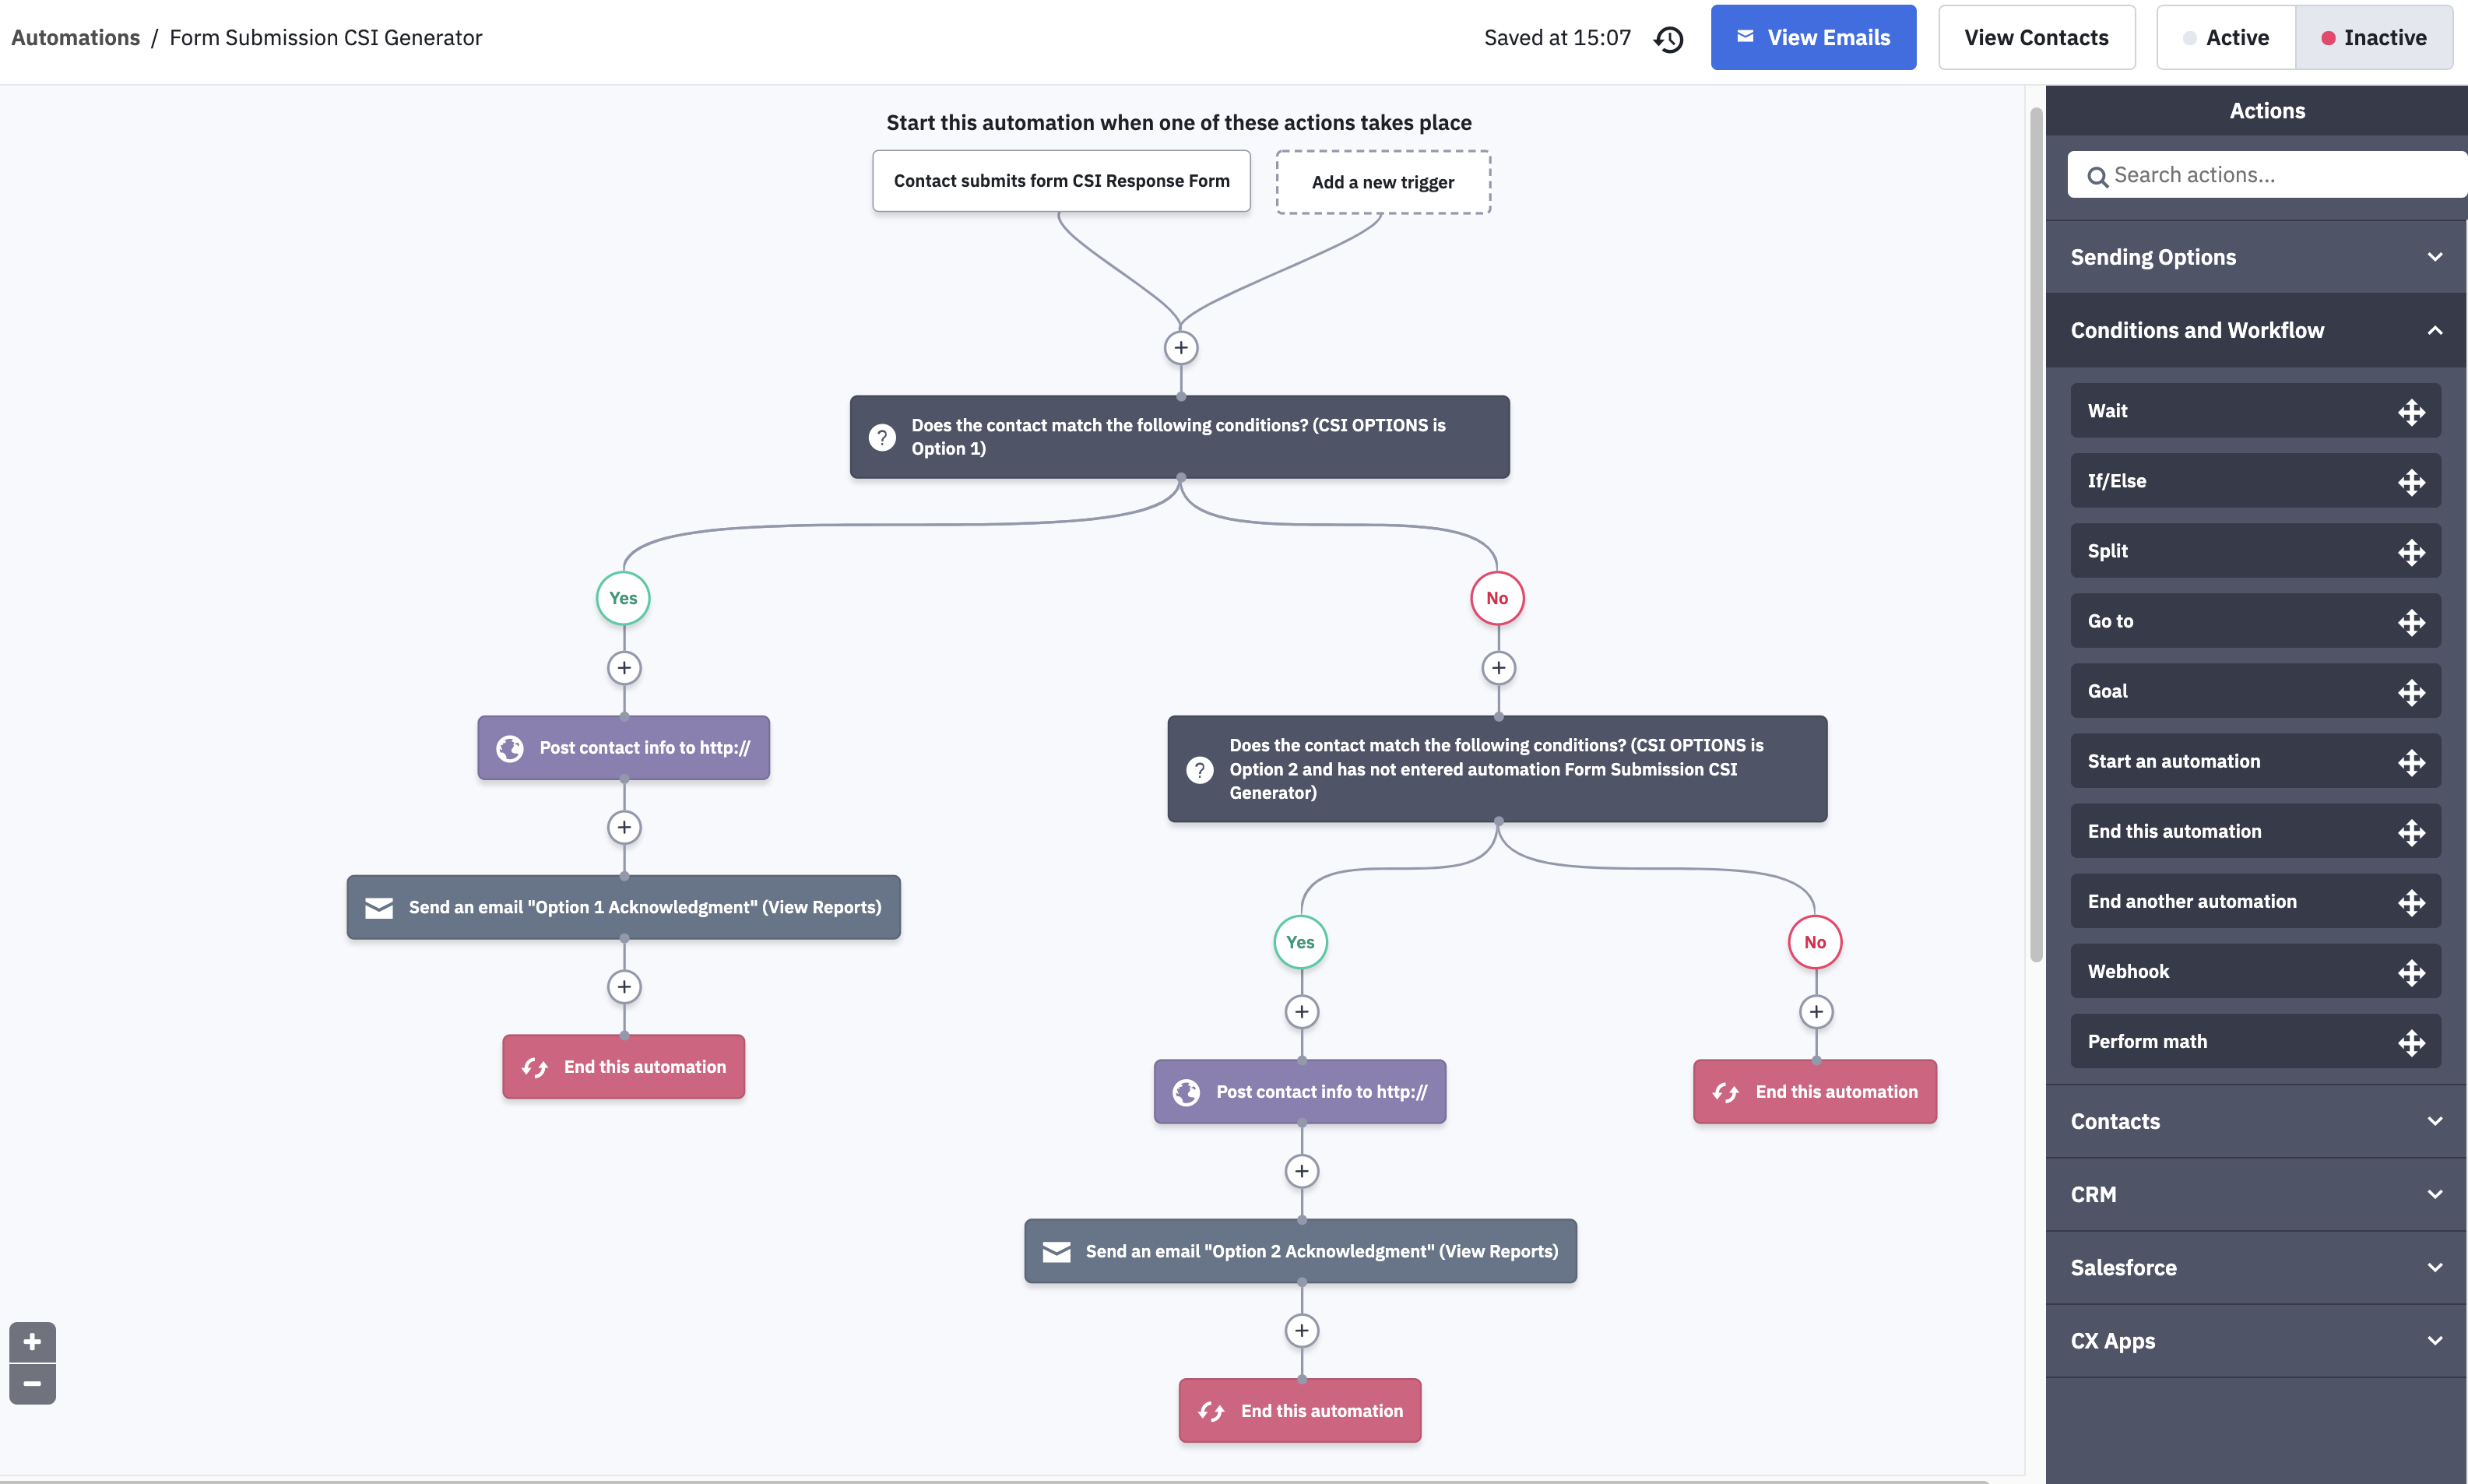
If you have more than two options in your form, you will continue adding IF/ELSE actions until all of your options are included.
ADDING TO YOUR AUTOMATIONS:
What is outlined above is all you need to generate a CSI in Tessitura from a Link Action in an email. Automations are flexible and customizable, allowing you to add on other communication, like an email acknowledgement of the selection the patron chose. If for some reason the patron clicked on the wrong option or changed their mind, a confirmation email lets them know what steps your organization is taking. In this confirmation email you could direct them to contact your organization's call center or box office where a representative could assist the patron and easily adjust the CSI that was created.